
Synchronize Microsoft Entra ID with Sophos Fusion
Microsoft Entra ID synchronization imports users and groups from the organisation’s tenant into Sophos Fusion (formerly Sophos Central). These objects are then available to the relevant Fusion products and policy assignments. Devices themselves are not synchronised from Entra ID.
Directory synchronization is not the same as single sign-on. It makes users and groups available in Sophos Fusion, but does not enable Entra sign-in to the Sophos Fusion portal. Administrator sign-in and its Identity Provider configuration are set up independently of directory synchronization.
⚠️ The Entra application receives extensive read access to the directory through
Directory.Read.All. It should therefore be used exclusively for this synchronization. The client secret must never appear in tickets, screenshots, chats, or the repository. The application ID and tenant domain are not passwords, but they should still be anonymized in public images.
Some of the existing screenshots still show the former name Azure AD and an older portal interface. The workflow remains recognizable; the current text is authoritative for menu names and permissions.
Requirements
Before configuration, the following requirements should be met:
- a suitable Sophos Fusion administrator role
- Microsoft Entra ID and permission to register a single-tenant application
- an Entra role permitted to grant tenant-wide admin consent for Microsoft Graph
- the primary tenant domain under
Microsoft Entra ID > Custom domain names - email addresses for the users Sophos Fusion should import
- an owner and a scheduled date for renewing the client secret later
Users from the same domain must not be synchronized simultaneously from local Active Directory and Microsoft Entra ID. AD can, however, continue to provide devices and device groups while Entra ID provides users and user groups from the same domain. Office 365 GCC High is not supported for this Entra ID synchronization.
Only one Entra ID source can be connected per domain. Users and email addresses must also not be synchronized to multiple Sophos Fusion accounts at the same time.
A Sophos Fusion account supports up to 25 directory sources; Sophos directs larger deployments to Sophos Central Enterprise. Trial licenses also limit the number of available directory objects. If users need Self Service Portal access for self-service email administration, configure User access before directory synchronization so new and existing users receive the intended notification and portal access.
Entra ID does not synchronize devices or delegation details for users, groups, or shared mailboxes. Shared-mailbox objects can be imported, but Fusion does not reconstruct their assigned delegates from Entra. This boundary matters particularly before moving from local AD to Entra ID.
Connect Microsoft Entra ID to Sophos Fusion
1. Prepare the directory source in Sophos Fusion
In Sophos Fusion, open the Global Settings icon and go to:
Platform > Directory service > Add Microsoft Entra ID
Enter a unique name, a short description, and the primary tenant domain. After Next is selected, Fusion expects the Entra application details created in the following steps.


2. Register a dedicated Entra application
In the Microsoft Entra admin center, complete the following steps:
- Open
Enterprise applications > New application. - Select Create your own application.
- Enter a unique name such as
Sophos Microsoft Entra ID Sync. - Select Register an application to integrate with Microsoft Entra ID and create the application.
- Select Accounts in this organizational directory only (Single tenant) as the account type.
- Select Web as the redirect URI type and enter
https://central.sophos.com. - Register the application.
central.sophos.com is retained here as a legacy-compatible technical redirect URI. For current portal sign-in, use Sophos Fusion.
Single tenant restricts the application to the organisation’s own directory. A dedicated app also separates directory synchronization from administrator sign-in and other integrations that require additional permissions or redirect URIs.


3. Record the client ID and client secret
Under Microsoft Entra ID > App registrations, open the new application. On Overview, record the Application (client) ID. The Object ID is not the client ID required here.
Then go to Certificates & secrets > Client secrets > New client secret and create a secret with an expiration date that suits the operating process. Immediately after it is created, two different values appear:
- Value: Enter this value in Sophos Fusion as the client secret.
- Secret ID: Do not use this identifier for the connection.
The secret value is visible only once. Store it immediately in an approved password manager and also document its owner and expiration date.


4. Grant read access through Microsoft Graph
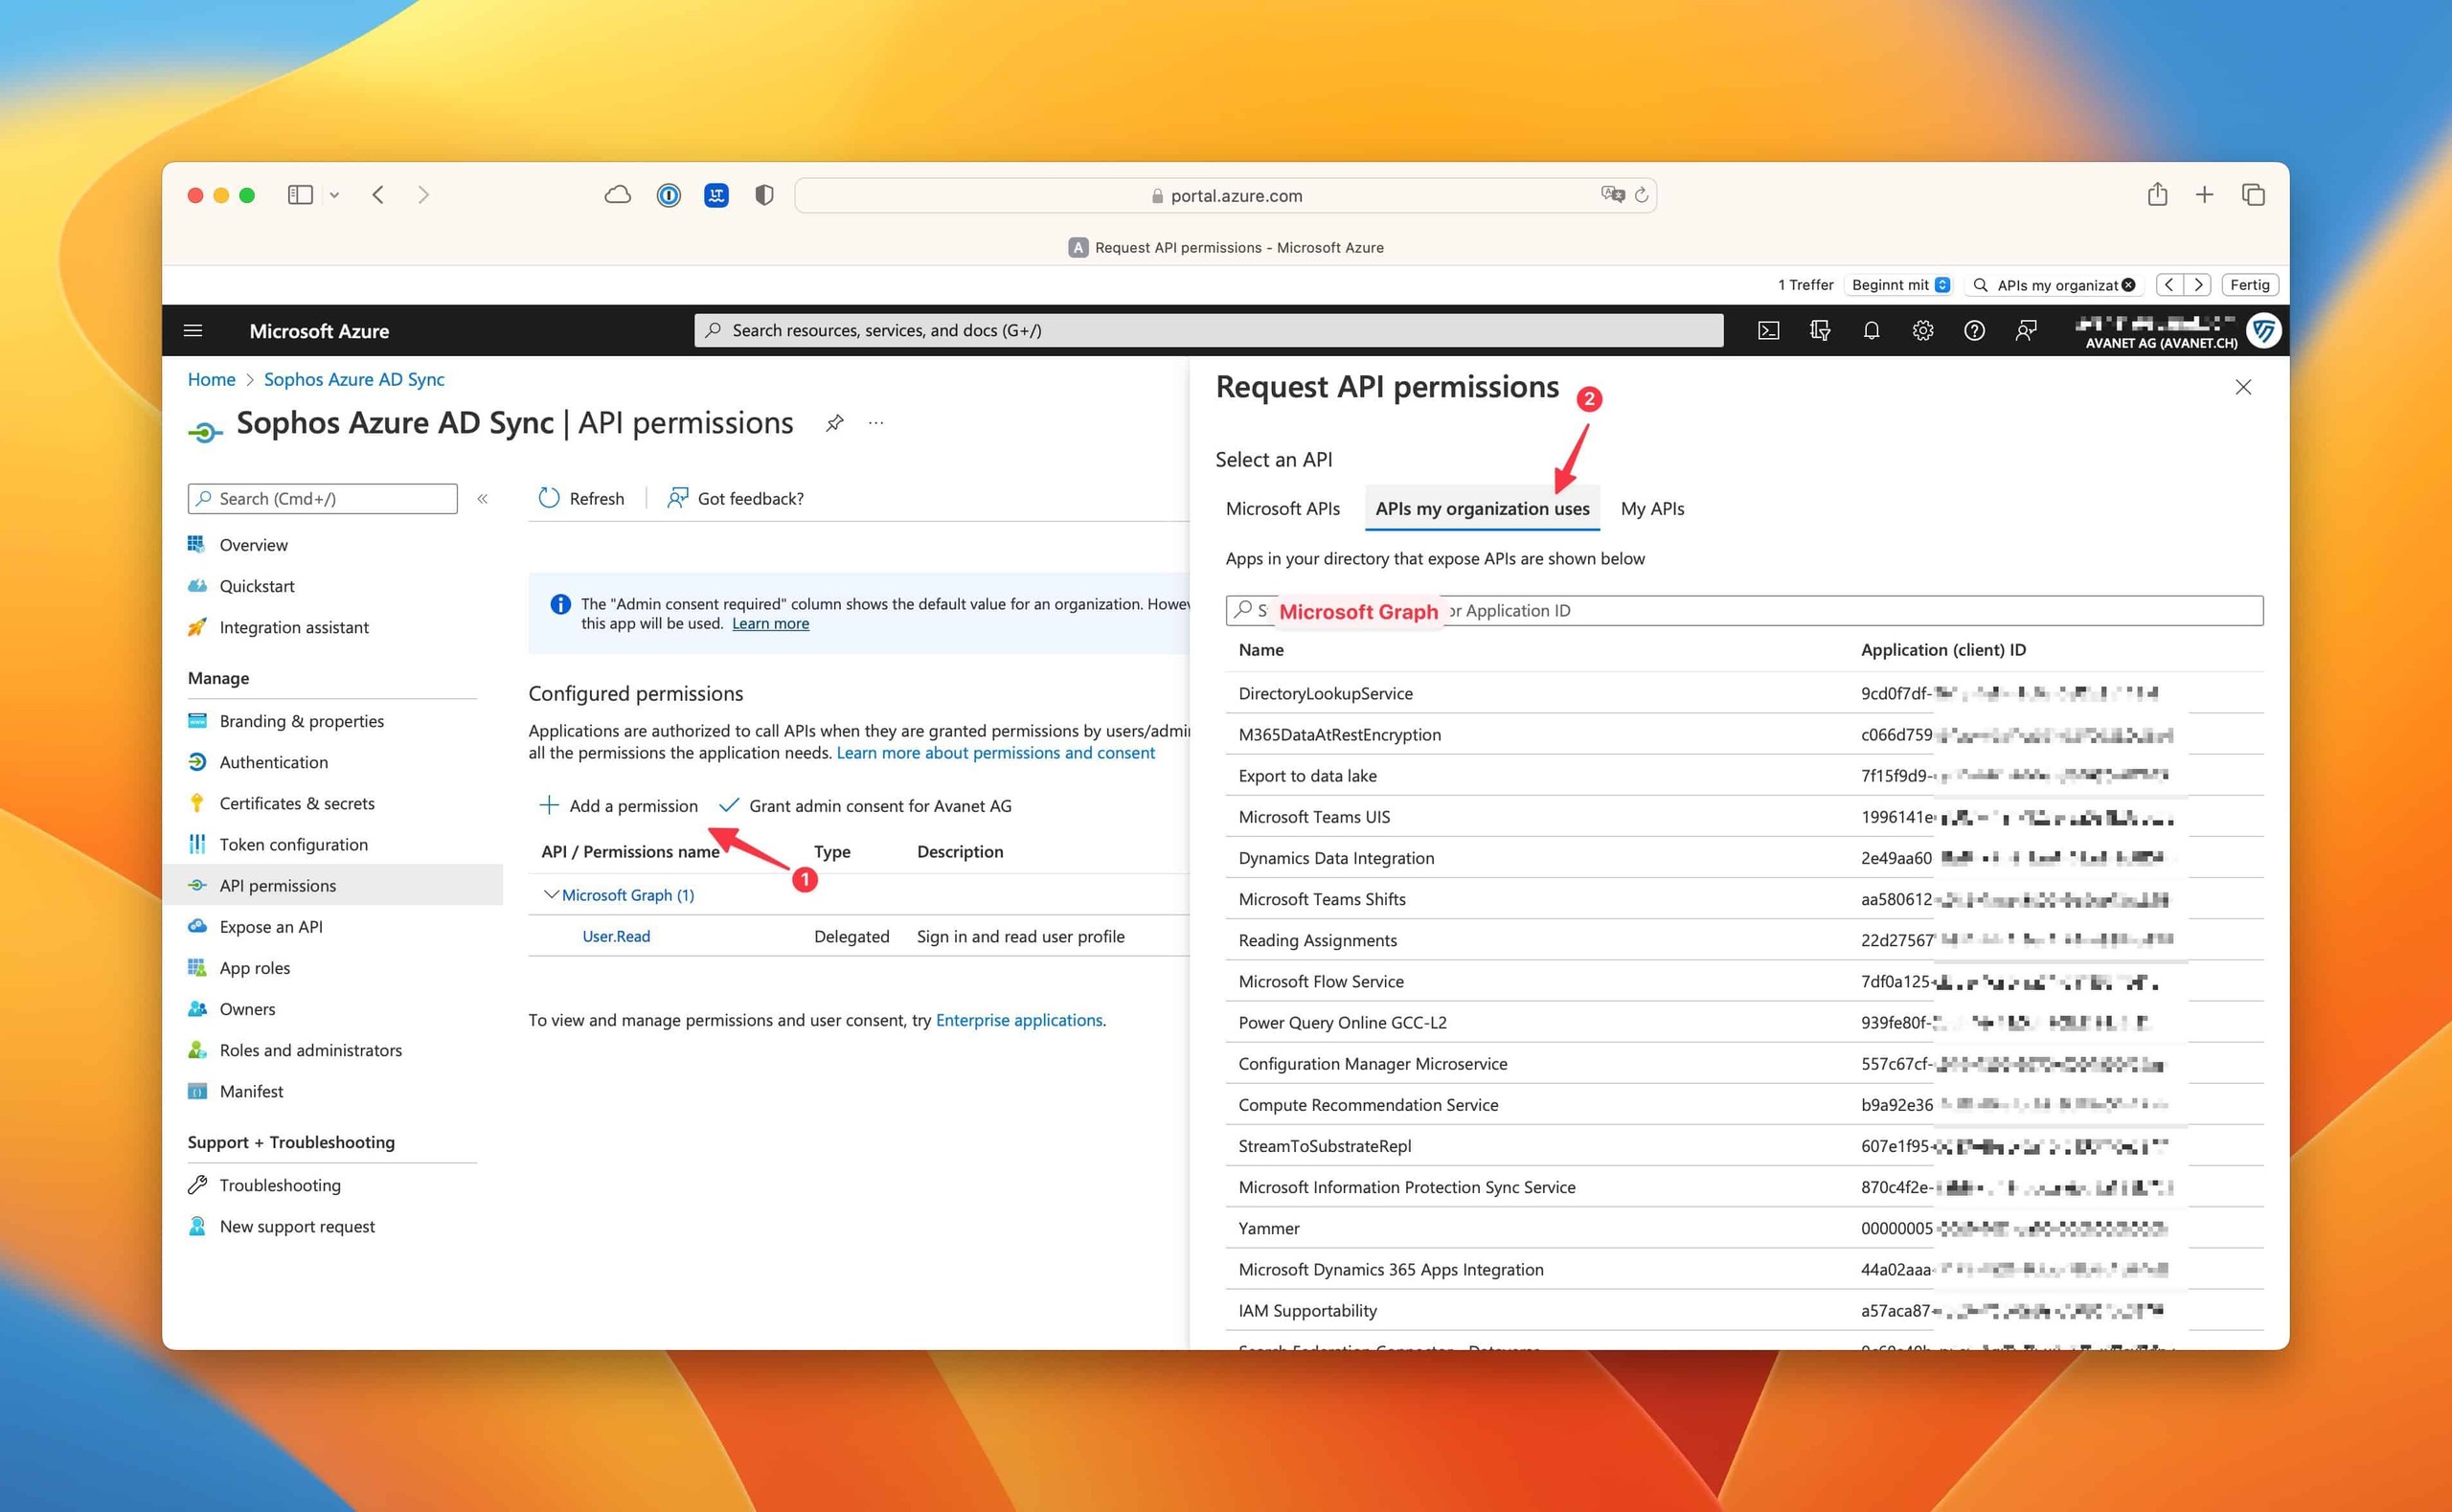
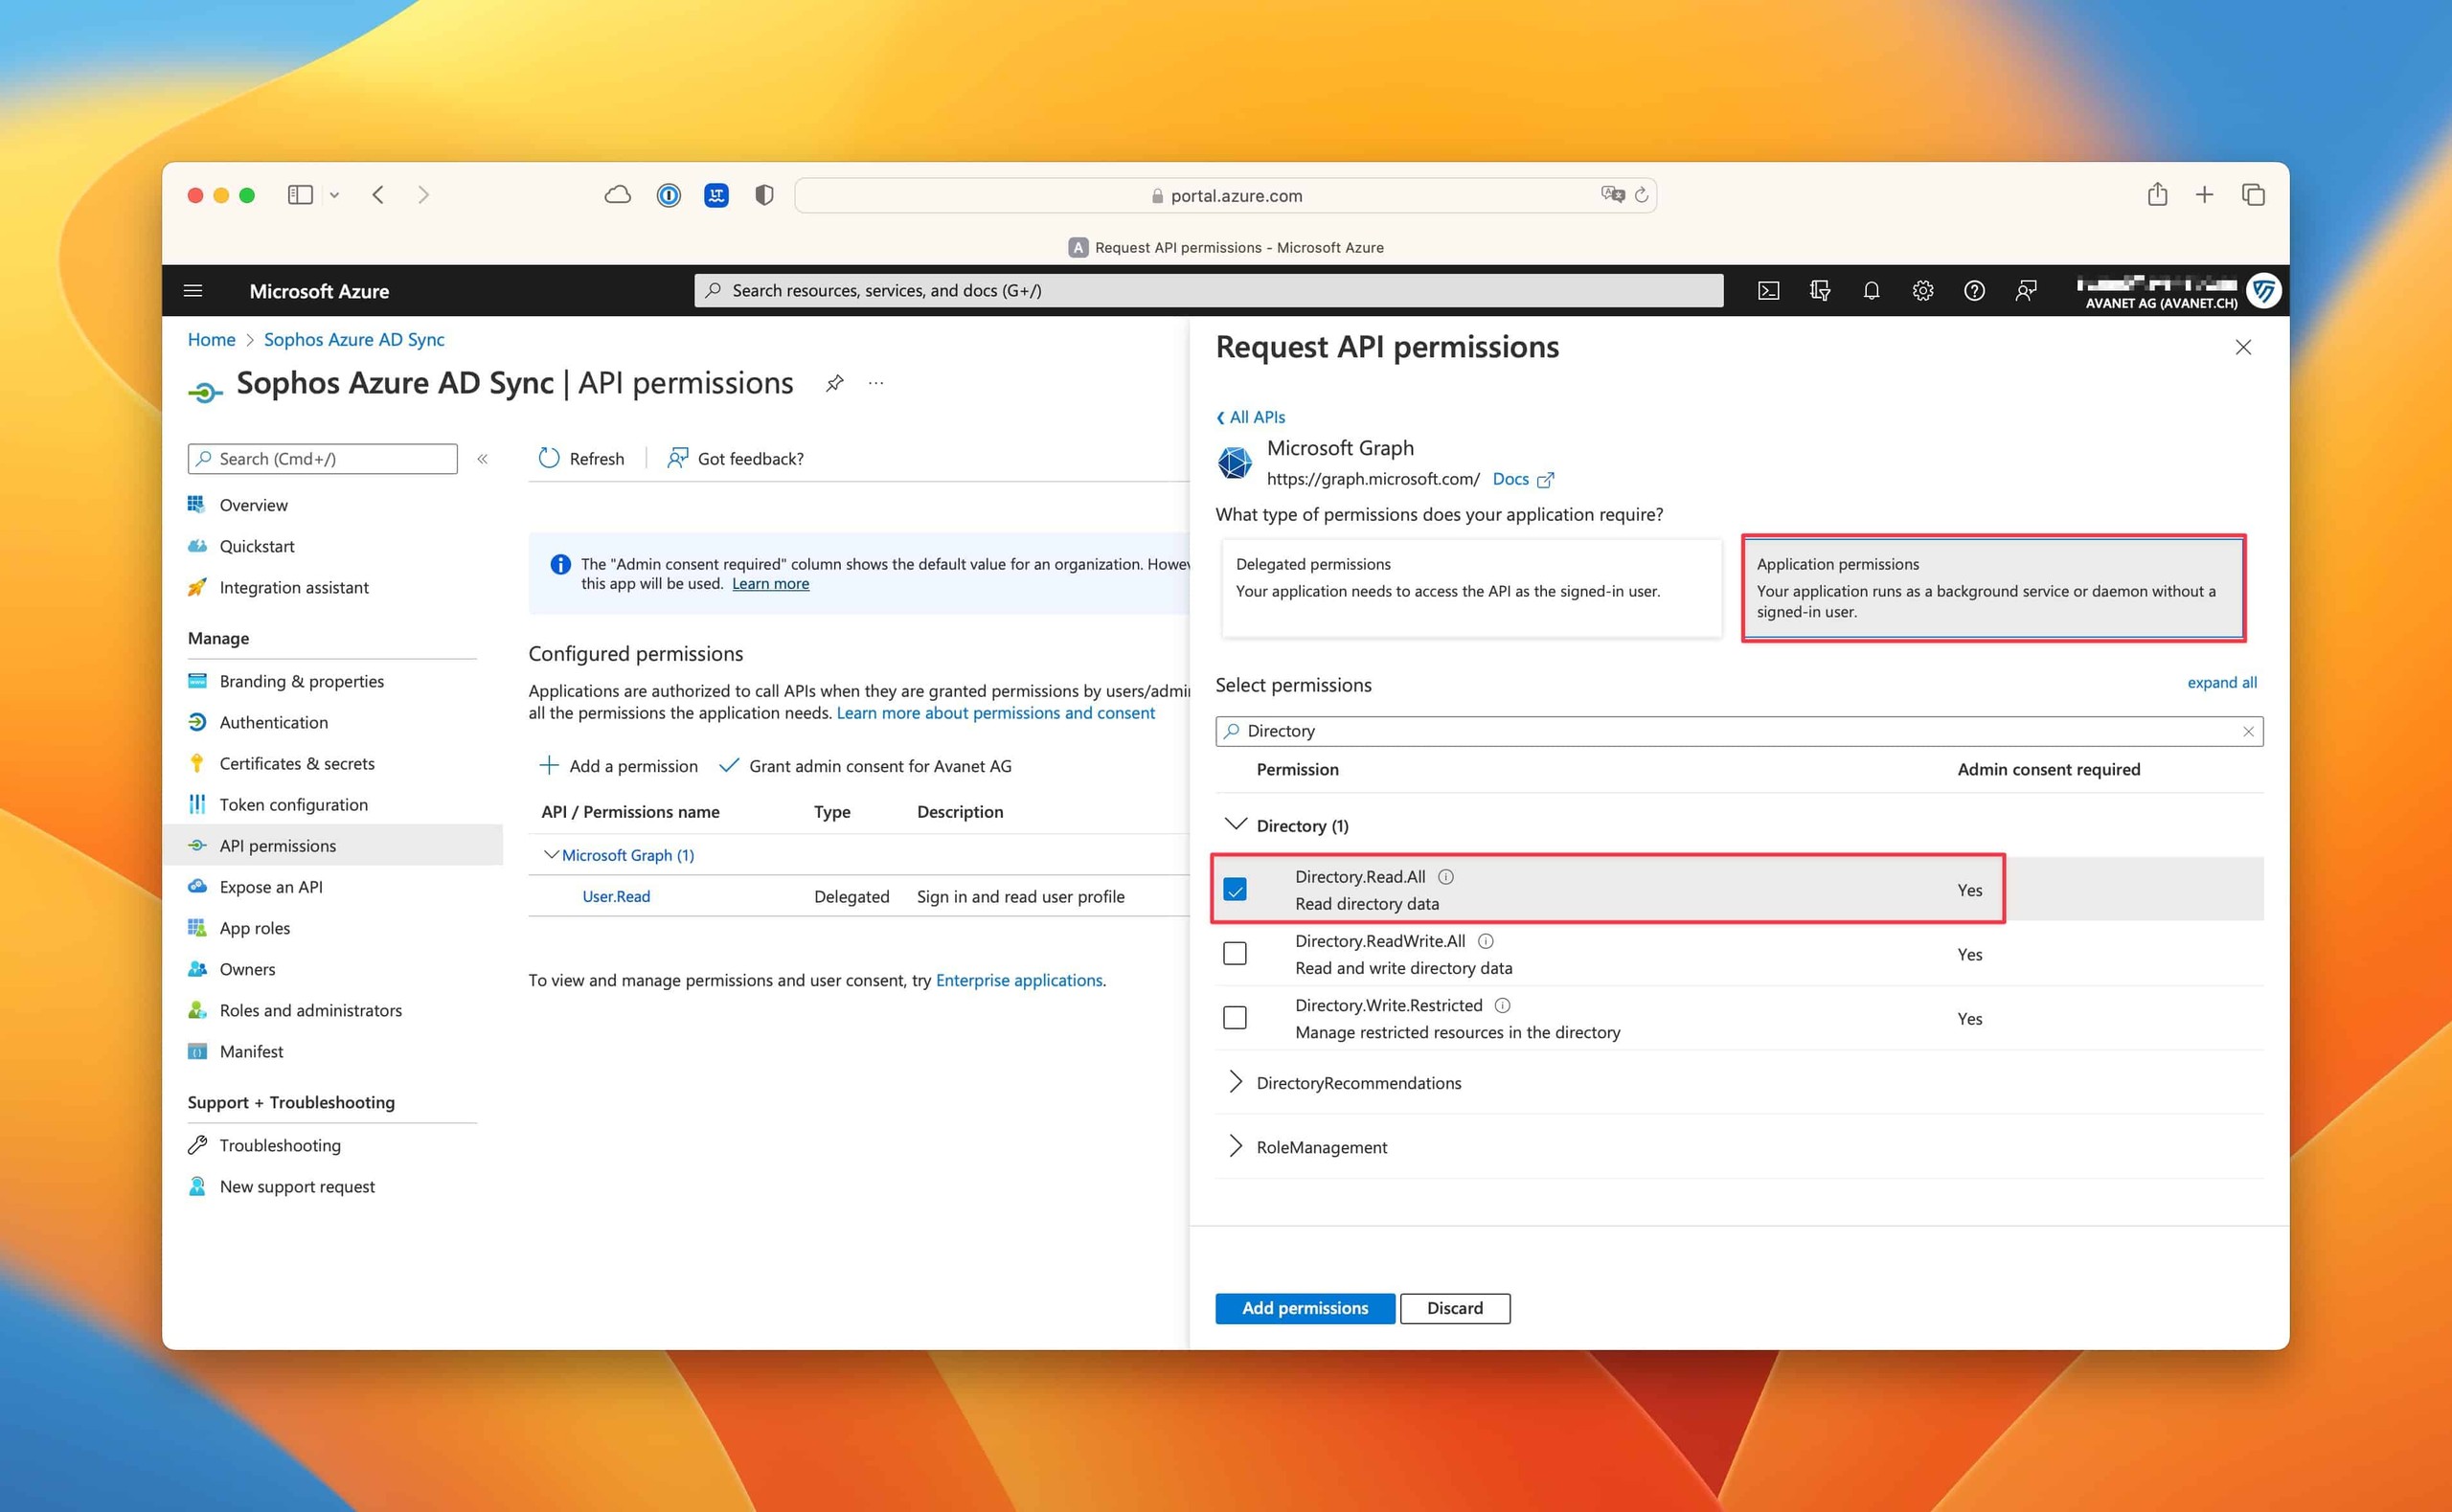
In the app registration, open API permissions > Add a permission > Microsoft Graph and add exactly this permission:
Application permissions > Directory.Read.All
Then select Grant admin consent for [Tenant]. The status must subsequently show Granted for [Tenant].
Directory.Read.All is an application permission because Sophos Fusion performs the synchronization in the background without a signed-in Entra user. Additional delegated permissions such as openid, profile, User.Read.All, or Group.Read.All are not required for this directory synchronization. Do not grant Directory.ReadWrite.All either: the synchronization needs read access, not write access to the tenant.


5. Save and test the connection in Sophos Fusion
Return to the prepared directory source in Sophos Fusion and enter the following values:
- Client ID: Application (client) ID of the Entra app
- Domain: primary domain from
Custom domain names, not the tenant ID - Client secret: the previously stored Value, not the secret ID
- Client secret expiration: expiration date of the secret
Next, select Test connection, save the settings with Save, and repeat the connection test using the stored data. Only two successful tests confirm that Fusion can use the saved values.

Select users and verify the first synchronization
Choose filters deliberately
Sophos Fusion can import all users and groups, up to ten groups by object ID, or objects selected through group or user filters. If Fusion already contains users, All users and groups is often the safest option for the first comparison because it gives Fusion the largest possible set of matches.
A group or user filter can contain no more than ten binary conditions and three levels of nested AND/OR groups. Plan for these limits before building complex filters; the filter view can’t fully predict the impact on existing Fusion objects.
If a directory object matches an identical Fusion object that was previously managed manually, the synchronization can take it over as a directory object. Before the first run, document the expected matches, roles, and important policy assignments in the change record. A later purge of synchronized data cannot be undone and can remove associated data.
⚠️ Changing the filter later adjusts the synchronized inventory. Users and groups excluded by the new filter are removed from Sophos Fusion during the next synchronization. Manually managed objects are not affected.
Save the selected method and its criteria with Save. Only then configure the schedule and production run.
Sophos documentation currently describes Preview inconsistently, and the function is not yet available in every tenant. If the tenant offers Preview after setup is complete, turn off the source to use it. The preview shows the selected data set, but not every consequence for existing Fusion objects. It remains valid for seven days or until the next synchronization; for more than 20,000 records, the result is available only as a JSON export. If the feature is unavailable, use a clearly defined pilot set and a documented list of expected objects for the first run.
Synchronize all users and groups
For the broadest comparison, open Global Settings > Platform > Directory service and select Microsoft Entra ID sync. Under Select users and groups to include in the synchronization, select All users and groups. Enable the source with Turn on, run Synchronize, and compare the result under My Environment > Users & Groups with the target list.
This is often useful for the first sync when Fusion already contains users and groups, because the largest source population can match the most existing objects. It is not automatically suitable for permanent operation. Exclude service accounts and unneeded groups through a narrower filter after the controlled first comparison.
Select groups by Object ID
Group Object ID imports selected groups and their users. Open each group in Microsoft Entra, copy its Object ID, and add it in Fusion through Group Object ID > Add group to the Group ID list. Fusion supports at most ten Group IDs. Review every entry before Turn on; remove an unneeded group from the list by its ID.
Switching to Object IDs replaces previously configured filters and can change the Fusion inventory. After Synchronize, review every selected group, representative members, and unexpected deletions under My Environment > Users & Groups.
Select users with a group filter
Under Select users and groups to include in the sync > Add users by group filter, first select whether any or all conditions and groups must match. Then choose the primary condition, appropriate operator, and comparison value. Operators depend on the attribute; Last directory sync time, for example, supports is, greater or equal, and less or equal.
Add condition narrows results further. Add group creates a nested subset within the already matched users. A filter can combine users whose last Directory Sync precedes a cutoff, who have a proxy address, and whose display name starts with Admin. Fusion supports at most ten binary conditions and three logical nesting levels.
After Turn on and Synchronize, review the result under My Environment > Users & Groups. Do not copy an example containing a historical date without review; use a current cutoff and known target population.
Select users with a user filter
Add users by user filter works directly with user attributes. Again, select any or all, followed by a primary condition, supported operator, and comparison value. For users in Germany, for example, use Country is Germany; depending on the attribute, starts with may be available instead of is.
Additional Add condition and Add group blocks refine the selection, such as German users whose display name starts with Admin. The same limits of ten binary conditions and three nesting levels apply. The filter becomes active only with Turn on, is then run with Synchronize, and is validated against expected users and groups under My Environment > Users & Groups.
Configure the schedule and start the first run
Under Synchronization schedule, select an hourly, daily, weekly, or monthly schedule. For Hourly, configure the interval and local start time; for Daily, the local time; and for Weekly, weekdays and time. Monthly supports up to two days in the month; Add another day adds the second. None means every run must be started manually. Save stores the schedule.
Then:
- Activate Turn on.
- Start Synchronize.
- Under
My Environment > Users & Groups, check an expected user, an expected group, and the membership relationship. - At the directory source, verify the status, last synchronization time, and the number of imported users and groups.
- If warnings appear, also open
AlertsandReports > Logs > General Logs > Events.
After Turn on > Synchronize, Fusion updates synchronization status. The Users and Groups links open the imported inventories, which should also be reviewed under My Environment > Users & Groups.
A successful connection test proves only that Fusion can use the Entra app. Only the verified user and group inventory confirms that the filters and synchronization produce the intended result.
Generate a synchronization preview
Preview becomes available only after setup is complete. If the source is already running, open it under Global Settings > Platform > Directory service and stop it with Turn off. Preview and the Preview tab appear only after the status change completes.
Preview starts calculation. Fusion displays a banner while it runs; after the banner disappears, review the result in the Preview tab. It remains valid for seven days or until the next production sync and can be exported as JSON. For more than 20,000 records, Fusion no longer shows the full table, so JSON export is required.
The preview describes the selected source population but does not replace reviewing policy, mailbox, and deletion effects. Before Turn on, compare users and groups no longer included against the last production inventory.
Move from on-premises Active Directory to Entra ID
During a migration, Entra ID replaces the AD source for a domain’s users and user groups. AD can continue to supply devices and device groups for the same domain. Public email folders, however, can only be managed through AD, and AD must then also synchronize users and user groups for that domain. Check this dependency before making the change.
Synchronize AD immediately before the switch and Entra ID immediately after adding the new source, then compare the objects from both sources. AD users without a match are removed from Fusion during the change, and their associated mailboxes may also be removed. Fusion stops updating existing shared mailboxes from AD and no longer shows their delegated users. The comparison must therefore cover users, user groups, shared mailboxes, devices, device groups, and public folders, not just the user count.
Use only Entra ID for the domain
- Synchronize the AD source and verify users, groups, mailboxes, and any devices.
- Open the AD source under Global Settings > Platform > Directory service and select Turn off.
- Select Add Microsoft Entra ID, configure the Entra source as described above, and synchronize it.
- In Fusion, check which users and groups were updated, created, or removed. Existing devices, device groups, and public folders remain, but are no longer updated without AD.
- Uninstall Active Directory Synchronization Setup only after the Entra inventory has been approved and no AD objects need further updates.
Keep Entra ID for users and AD for devices
- Synchronize the AD source and verify the current inventory.
- Change the AD filters so that only devices and device groups are synchronized, then turn off the AD source.
- Add and turn on the Entra source, then verify users, user groups, and shared mailboxes.
- Turn the AD source back on, synchronize it, and verify devices and device groups.
After the move, Entra ID updates matching users and groups and creates new objects. Unmatched AD users are deleted, whereas unmatched AD groups are retained but no longer updated. Shared mailboxes from AD remain with their last AD state but lose visible user associations; new Entra shared mailboxes also appear under Users and Mailboxes. These different outcomes are why the migration needs a separate expected-object list.
Renew the client secret before it expires
An expired secret stops subsequent synchronizations. Start the rotation before the expiration date:
- Create a new client secret in the existing app registration and securely record its Value and expiration date.
- Pause the Entra ID source in Sophos Fusion with Turn off.
- Enter the new secret value and expiration date.
- Run Test connection, select Save, and run Test connection again.
- Activate the source with Turn on, start a synchronization, and verify the users and groups.
- Remove the old secret from Entra ID only after the successful verification.
Before the source is turned on again, Revert can undo a configuration change that has not yet been activated in Fusion. After Turn on, the new configuration takes effect during the next run.
Change, purge, or delete the source
Change the name, description, filters, and schedule only while the source is off. The new configuration becomes active with Turn on and then cannot be returned to the previous state through Revert. Before every filter change, document the prior definition and create a target list of expected users and groups.
Purge data irreversibly removes data synchronized from this source. It is neither a normal connection test nor the first response to an expired secret. Before purge, review roles, device assignments, mailboxes, groups, and policy links. To remove the source as well, turn it off, purge it, and only then select Delete directory source. Neither a deleted source nor its data can be recovered.
Change the Entra source configuration
This function may not yet be available in every tenant. Open Global Settings > Platform > Directory service, select the source name, and stop synchronization with Turn off. Then edit the name, description, Azure configuration, filters, and schedule.
If the Client ID, domain, or Client Secret changed, run Test connection. Save stores the new configuration. While the source remains off, Revert restores the state active when it was turned off. Turn on makes the change binding; it can then no longer be reversed through Revert and takes effect on the next sync. Compare that run with the expected user, group, and error values.
Purge synchronized Entra data
To remove all synchronized data, open the Entra source under Global Settings > Platform > Directory service and stop it with Turn off. Then select More > Purge data, explicitly confirm irreversibility, and select Purge data again. Monitor source status until it shows the completed purge.
A purge deletes the data imported from this source, not merely a cache. Document affected users, groups, mailboxes, roles, and policy assignments first. Cancel without that approval.
Delete the Entra source completely
A source can be removed only after its synchronized data is purged. Under Global Settings > Platform > Directory service, open the source, stop it with Turn off, and delete through More > Delete. If synchronized data remains, Fusion first requires Purge now, confirmation of irreversibility, and Purge data.
After the purge completes, select Delete and Delete directory source. Neither the source nor deleted data can be recovered. Review the Entra app and its secret separately and, if they served only this source, remove them from Microsoft Entra after documented rollback.
Troubleshoot common errors
Verification failed due to invalid client ID
The Object ID was usually copied instead of the Application (client) ID, or sign-in for the related enterprise application is disabled. Check both items in Entra ID and repeat the connection test.
AADSTS7000215: Invalid client secret
Fusion requires the secret Value displayed once after creation. The similar-looking secret ID does not work. If the value is no longer available, create a new secret and enter it carefully.
AADSTS7000222: Client secret expired
The secret has expired. Create a new value, store it in Fusion together with its new expiration date, and complete the full rotation procedure.
The connection works, but users or groups are missing
First check whether the source is turned on, a synchronization has run, and the expected schedule is active. Then verify the filters, the user’s email address, group membership, and the primary domain. Under API permissions, Directory.Read.All must appear as an Application permission with admin consent granted.
Users appear twice
Sophos Fusion cannot reliably merge an Entra user with a user previously created through an endpoint sign-in if the UPN, email address, and login do not match. Before cleaning up anything manually, document both identities, the affected devices, and their policy assignments.
For a controlled merge, open Logins > Edit on the device-created user, remove the login and save. Assign the same login to the synchronised Entra user afterwards. Delete the now-empty device-created user only after devices, Health and Policies appear correctly on the Entra object. If the old user held an administrator role, remove it first and then deliberately assign it to the Entra user.
Automatic association works only when the login reported by the Endpoint matches the Entra UPN. Different separators, additional subdomains or another local login create separate objects. Before a broad rollout, use a pilot device to verify which UPN Sophos Fusion actually reports.
Users disappear after a filter change
This is often not a transmission error. The new filter defines the next synchronized inventory and can remove objects imported previously. Turn the filter off or correct it, document the expected scope, and only then synchronize again.
After every filter change, Fusion requires Test connection again. Only then can the configuration be saved with Save or Save & Sync. The message The connection must be verified before saving the configuration is therefore expected protective behaviour, not an authentication error.
Frequently asked questions
Does Entra ID also synchronize computers and computer groups?
Why does the client secret not work?
Directory.Read.All must also be correct.