BlackWinter Promo
Save up to 50%80%70%70%70%70%70%70%70% on a Sophos Firewall of your choice.
Choose XGS Firewall modelSave up to 50%80%70%70%70%70%70%70%70% on a Sophos Firewall of your choice.
Choose XGS Firewall modelThis article shows how to set up STAS (Sophos Transparent Authentication Suite) on a Sophos Firewall using the SFOS. In this tutorial, STA Suite is installed on the Active Directory server.
The full name of STAS is “Sophos Transparent Authentication Suite”. Included in this suite are two small tools that allow your Sophos Firewall to create firewall rules for your Active Directory users. Here is a brief description of the two included programs:
STAS works by monitoring the Active Directory log and telling the firewall which users are logging in or out. For this it is important that these events are also logged.
Info: The following settings must be made on each Active Directory server where STA Agent is installed.
On your Active Directory server, open the program Local Security Policy. This can be found in the Windows Administrative Tools (secpol.msc). Next, you need to open the Audit account logon events. To do this, first go to Security Settings > Local Policies > Audit Policy as shown in the screenshot below and open Audit account logon events.
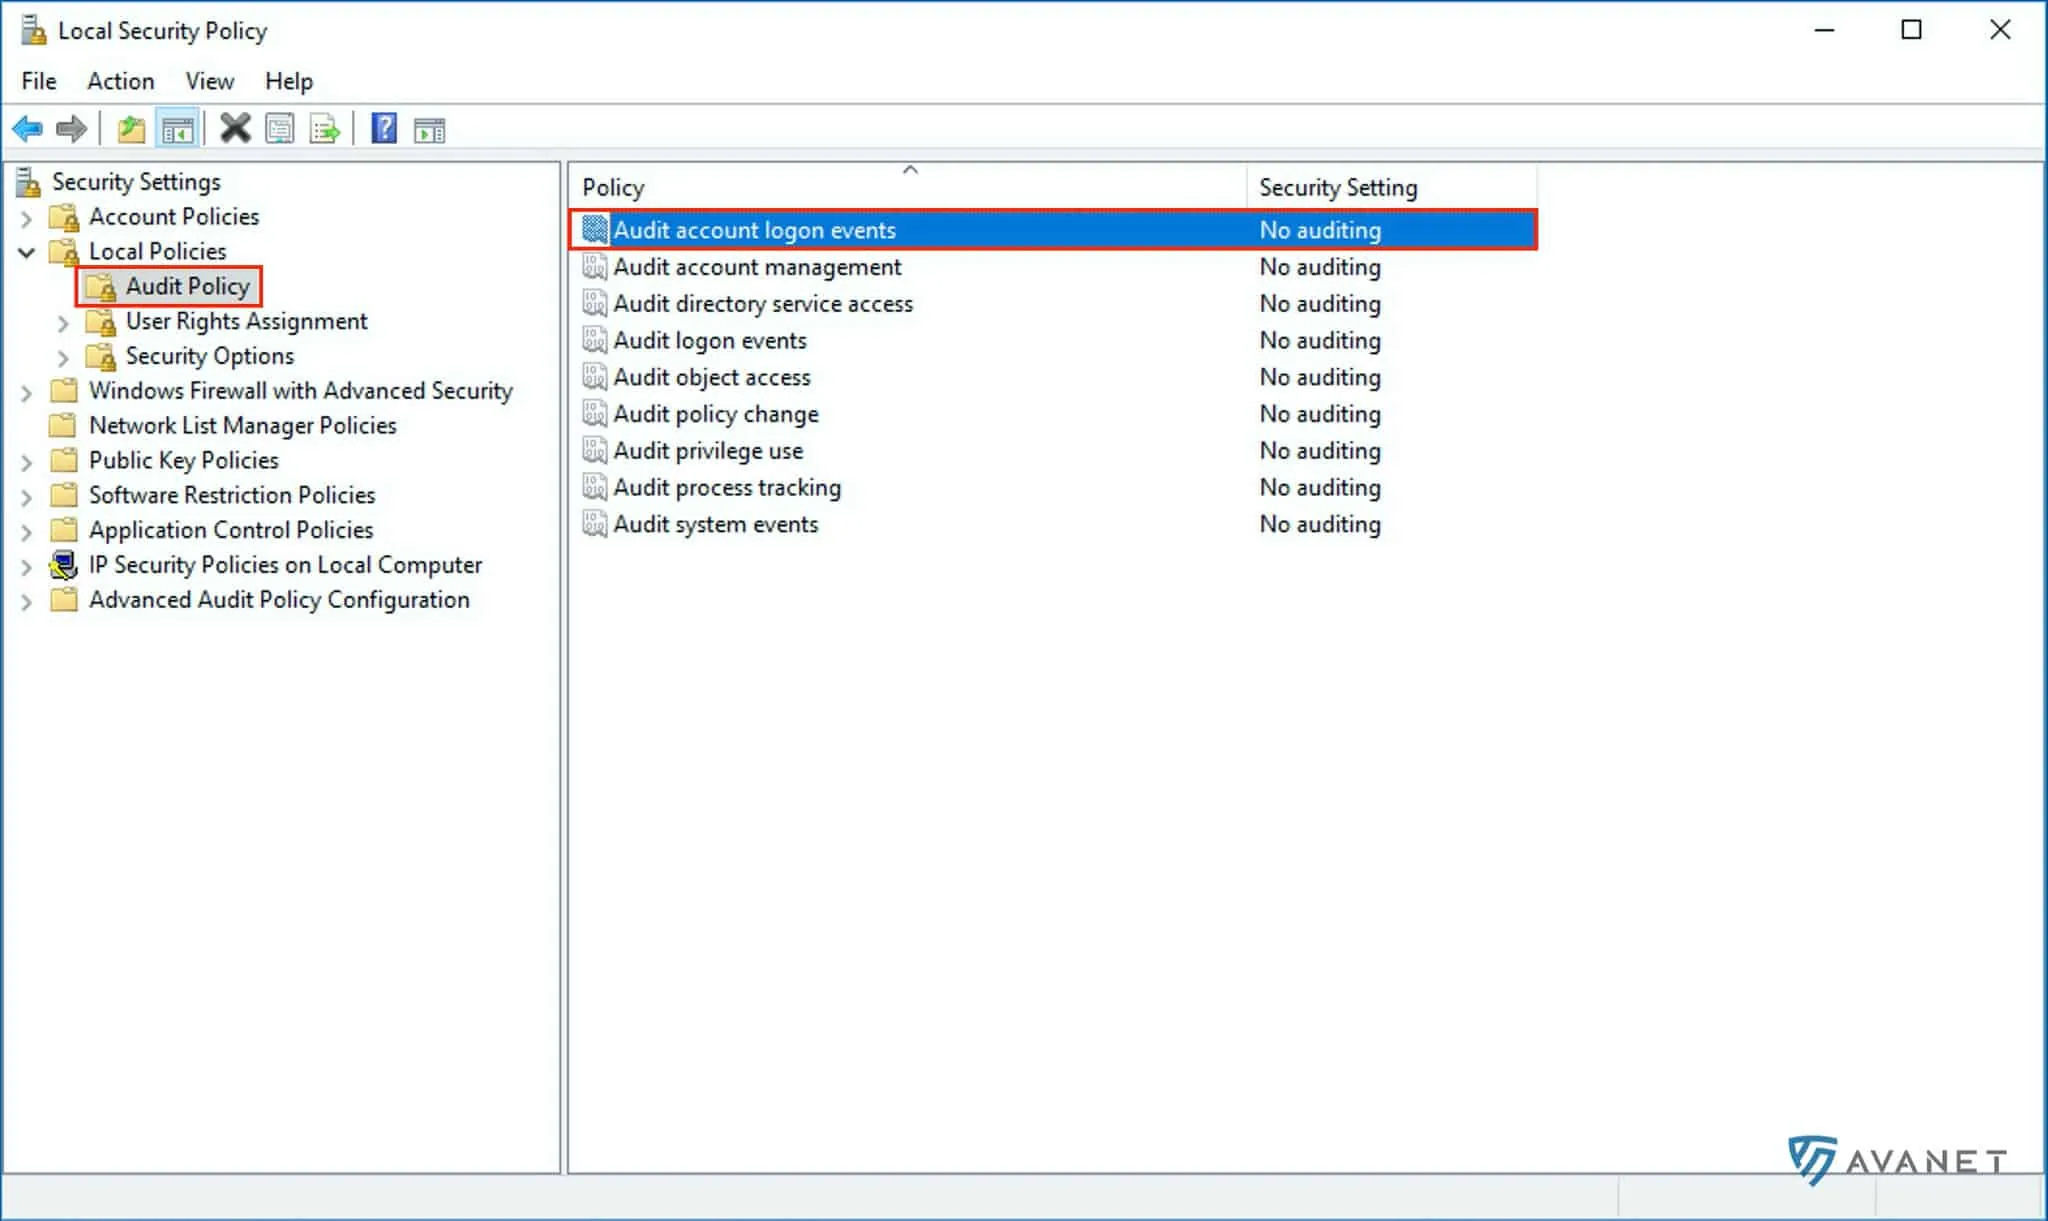
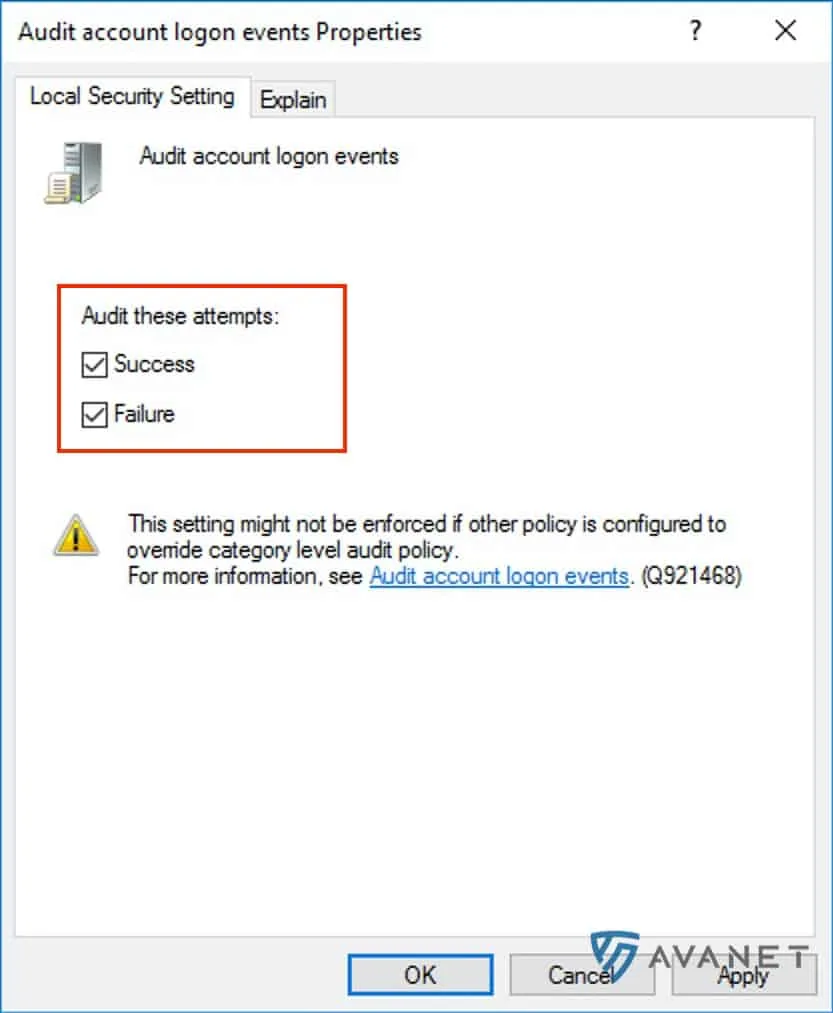
Then activate the options Success and Failure and confirm your changes with OK.
If you want to start the STAS service with your own user, you still need to perform the following steps. Otherwise, you can skip this step. Switch to the Local Security Policy to the following path: Security Settings > Local Policies > User Rights Assignment. Then open the option Log on as a service.
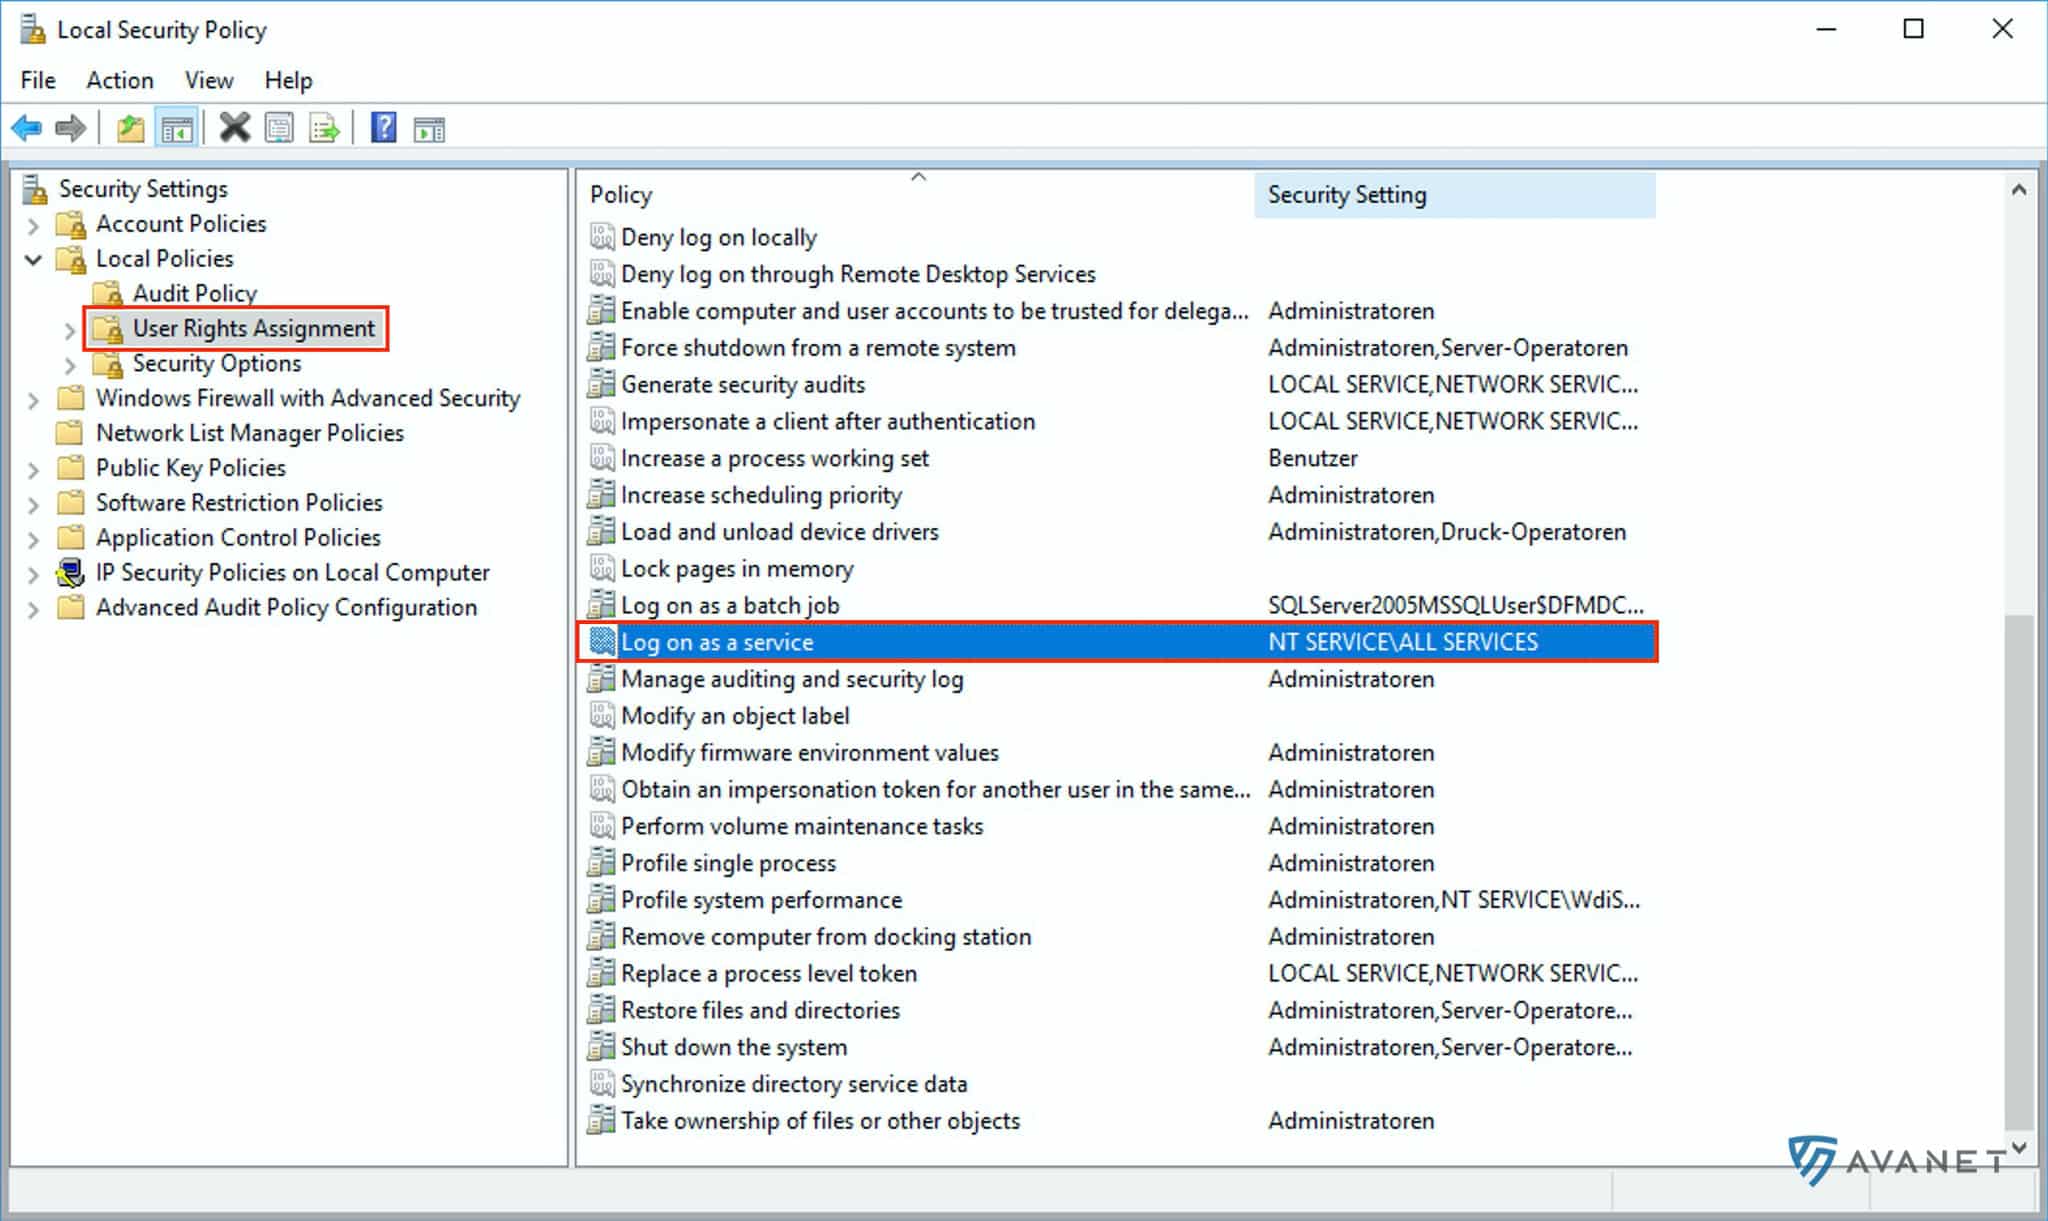
Then click Add User or Group and add your user.

The Active Directory server should have the following ports open:
You only need to enable the following ports if you use these methods:
Workstation Polling Method (WMI) or Registry Read Access:
Logoff Detection Ping:
STAS Collector Test:
STAS Configuration Sync:
Note: RPC, RPC locator, DCOM and WMI services should also be enabled on the clients for WMI/Registry Read Access.
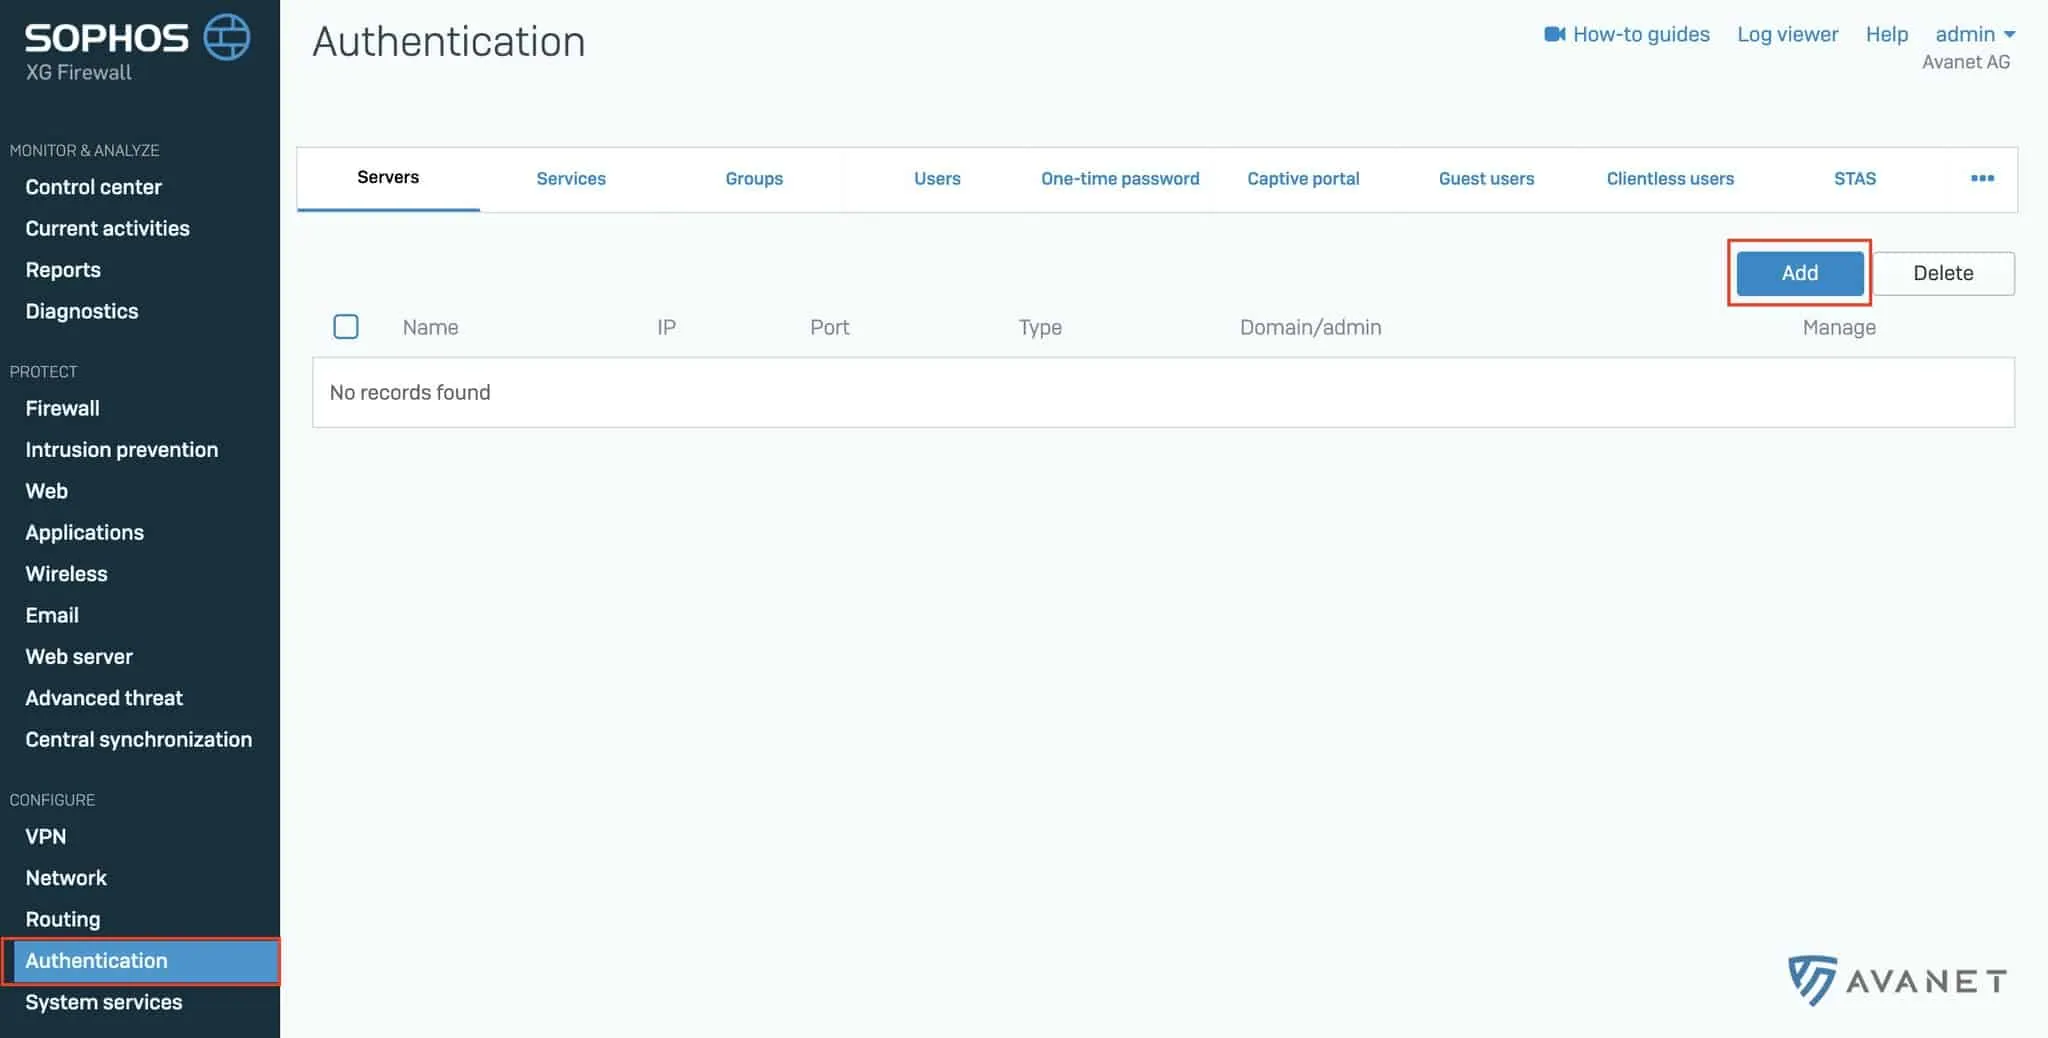
After you have prepared the Active Directory with a few settings on STAS in point 1, it is now time to add the AD on your Sophos Firewall. To do this, log on to your Sophos Firewall (SFOS) as an administrator and go to Authentifizierung > Server from the menu. Then click the blue button Hinzufügen to add a new server.
In the following instructions, we will guide you step by step through all the necessary entries: Add Active Directory to Sophos Firewall
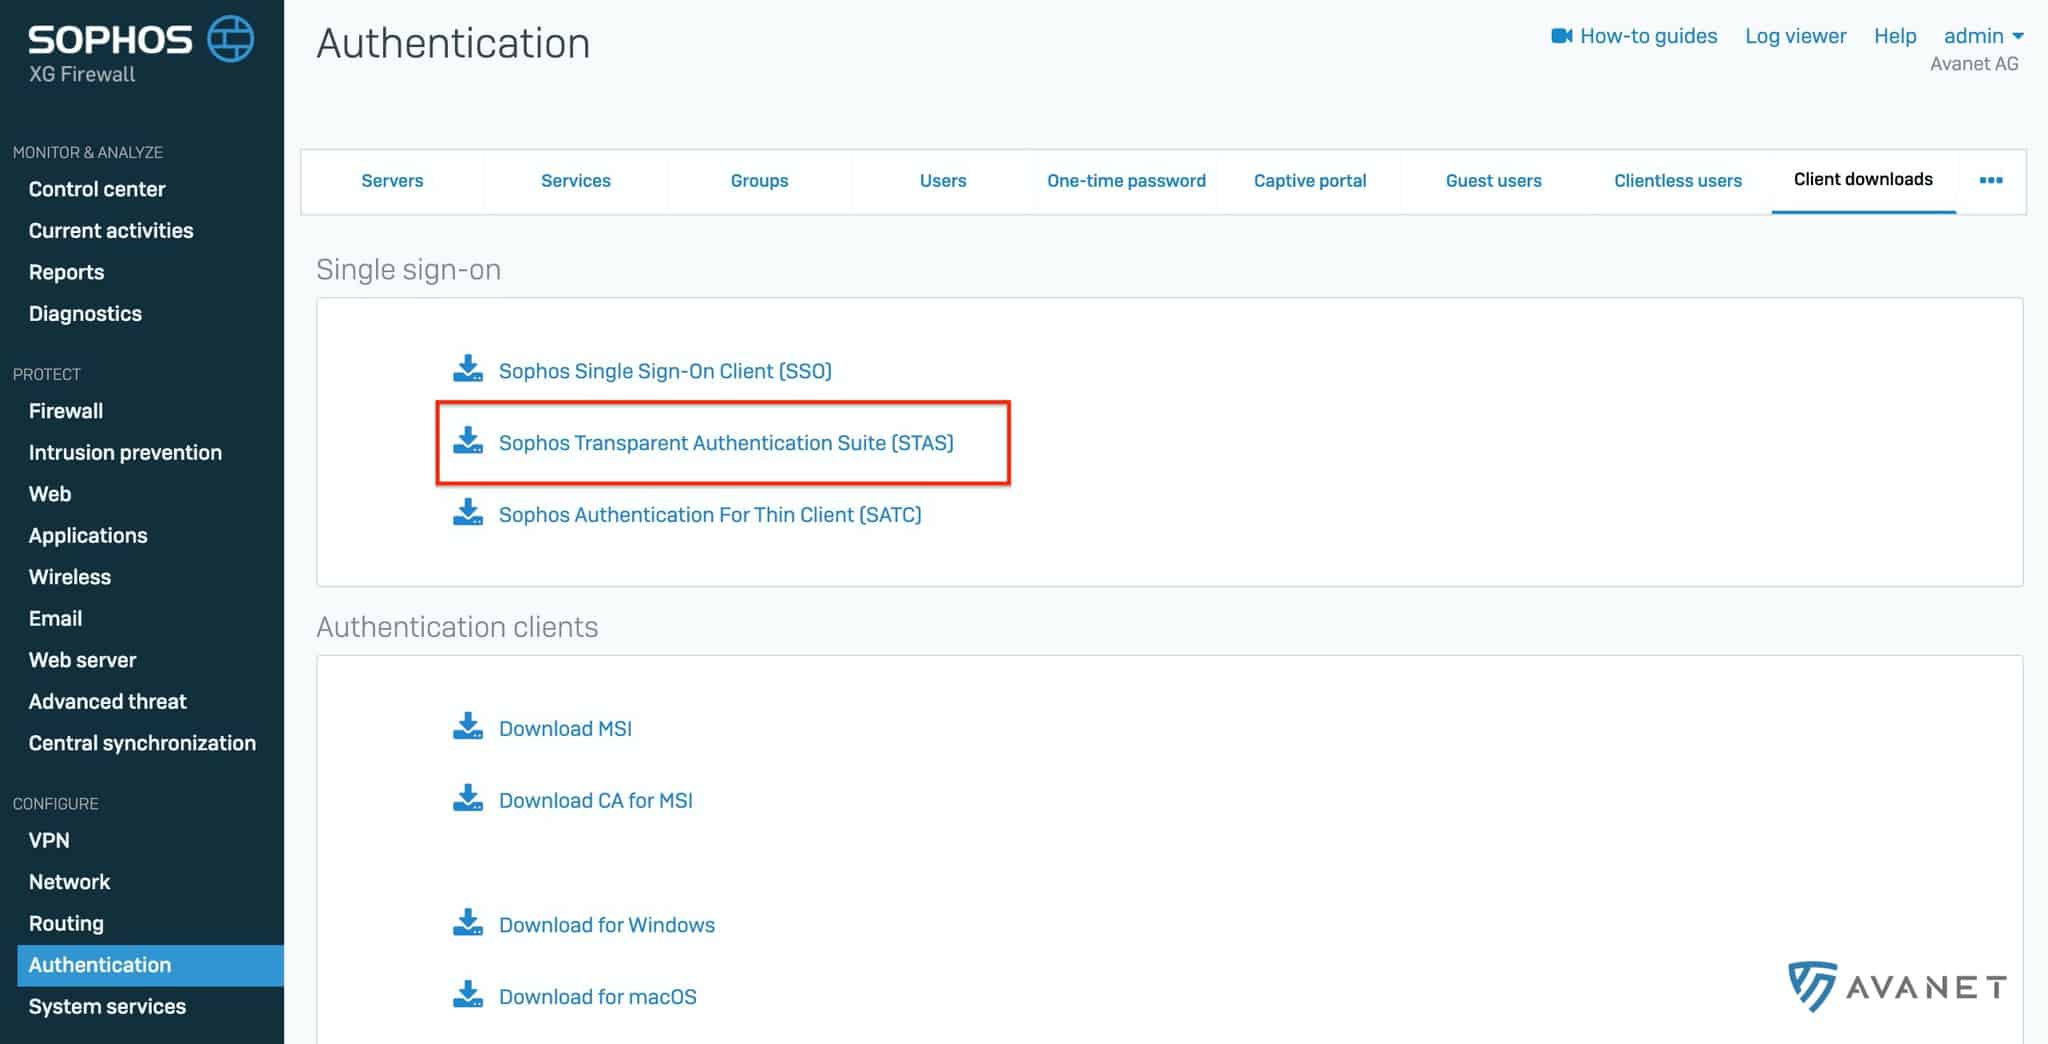
Now let’s turn back to the Active Directory server. Here we will next install STA Suite, which you will first need to download from your Sophos Firewall. To do this, log on to your Sophos Firewall (SFOS) as an administrator and go to Authentifizierung from the menu. Then click on the three dots in the top right of the tab navigation and select Client-Downloads from the drop-down menu.
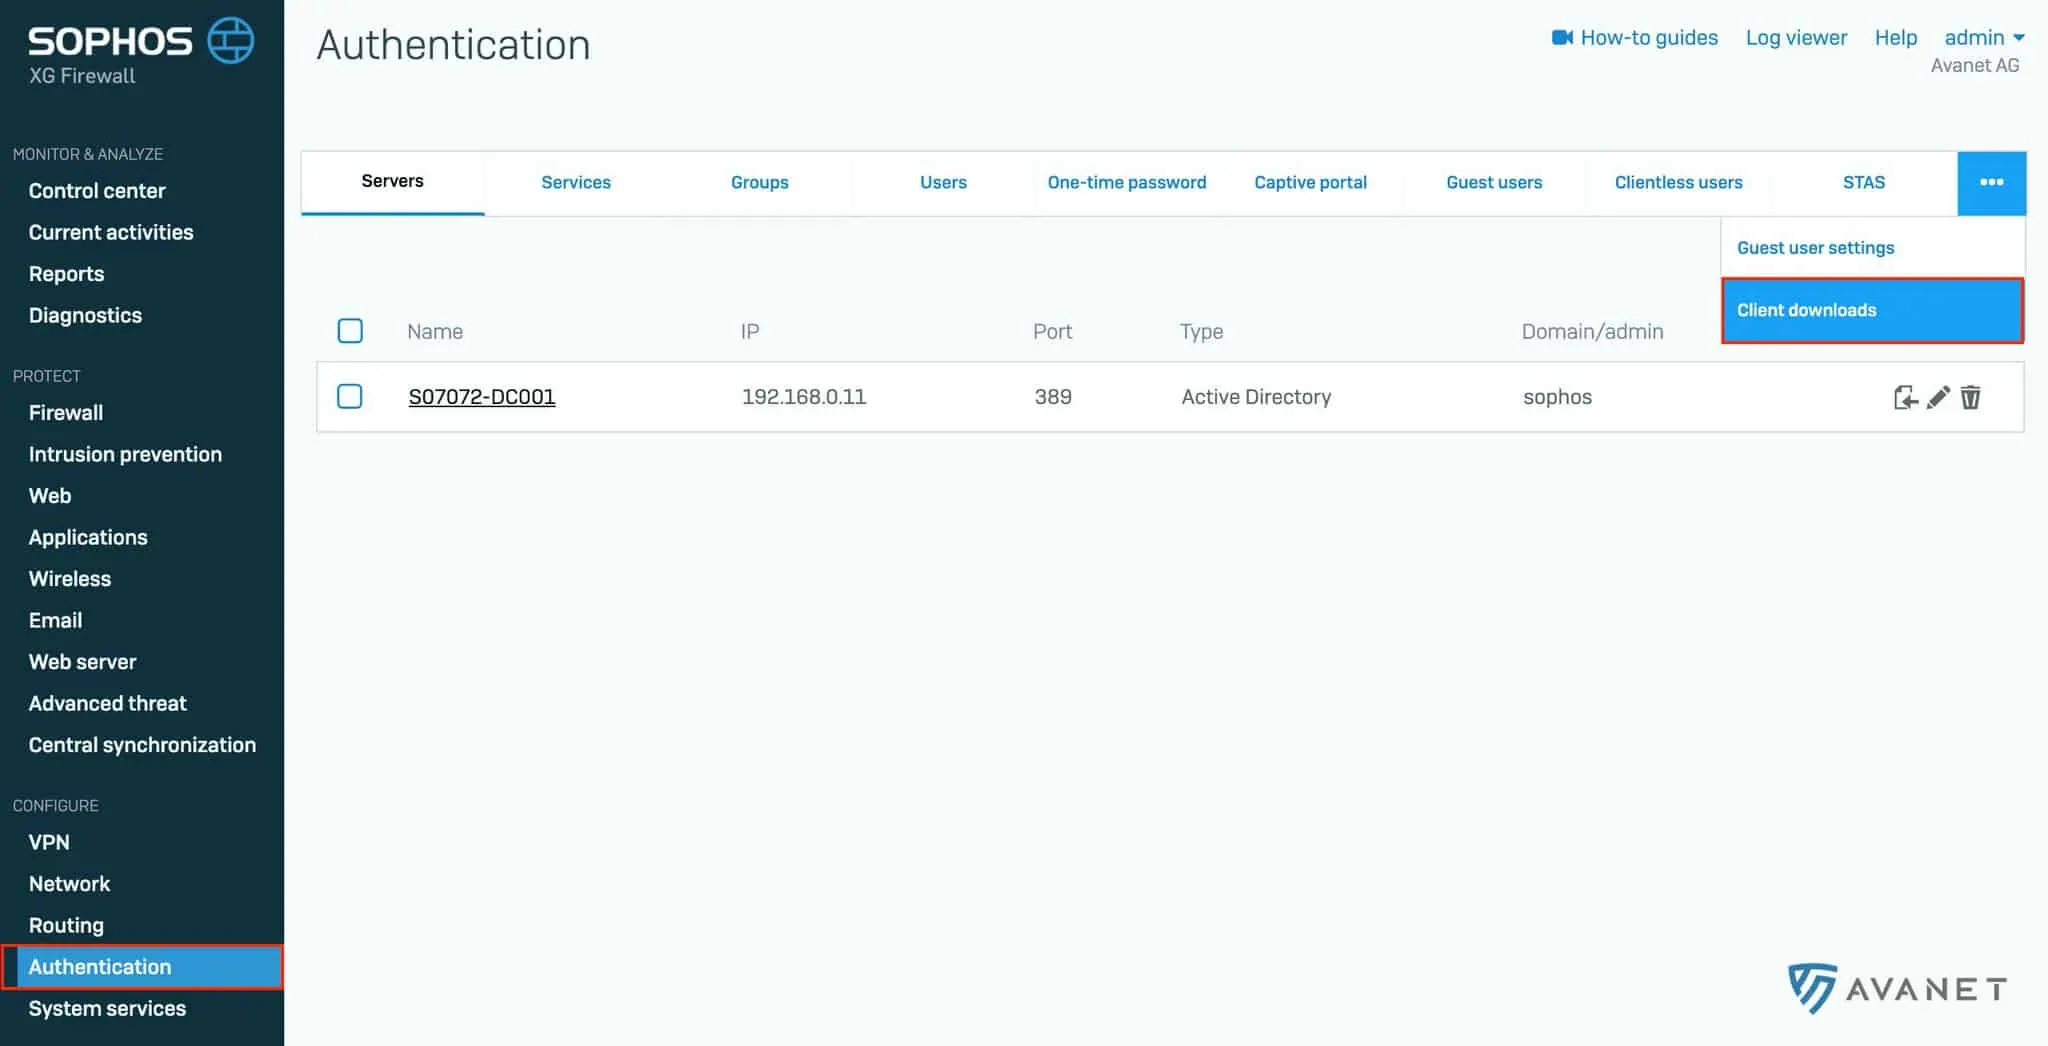
In the Single-Sign-On section you will find the required Sophos Transparent Authentication Suite (STAS) for download.
Info: You can also download STA Suite directly from the Sophos website: UTM Support Downloads
Now run the downloaded STAS.exe and click through the installer. During the installation, the following window will appear, where you can choose between three different options:
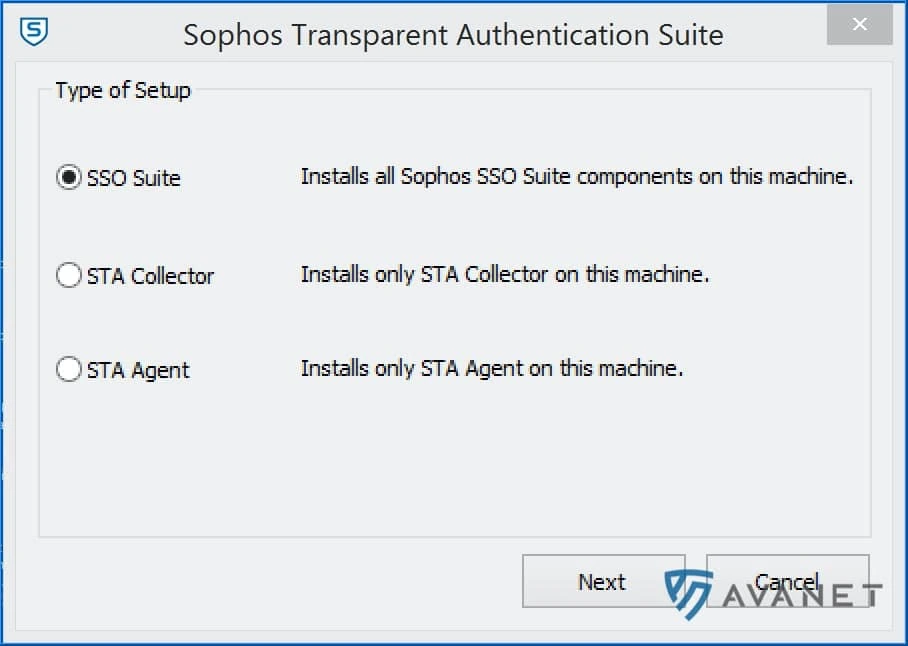
By default, you can leave SSO Suite selected here, which will install all components on the Active Directory. However, if you want to install e.g. STA Collector or STA Agent on two different systems, then you have to adjust the selection here accordingly. If you have two Active Directory servers, then you need the STA Agent on both systems, but only one STA Collector. Again, depending on the situation, simply adjust the selection.
During the installation you also have to specify a user with which the service should be installed and started. In this tutorial, I’ll just take the domain administrator for the sake of convenience, since he certainly has the necessary permissions. For a productive environment, a specific user created for this purpose would certainly be recommended here.
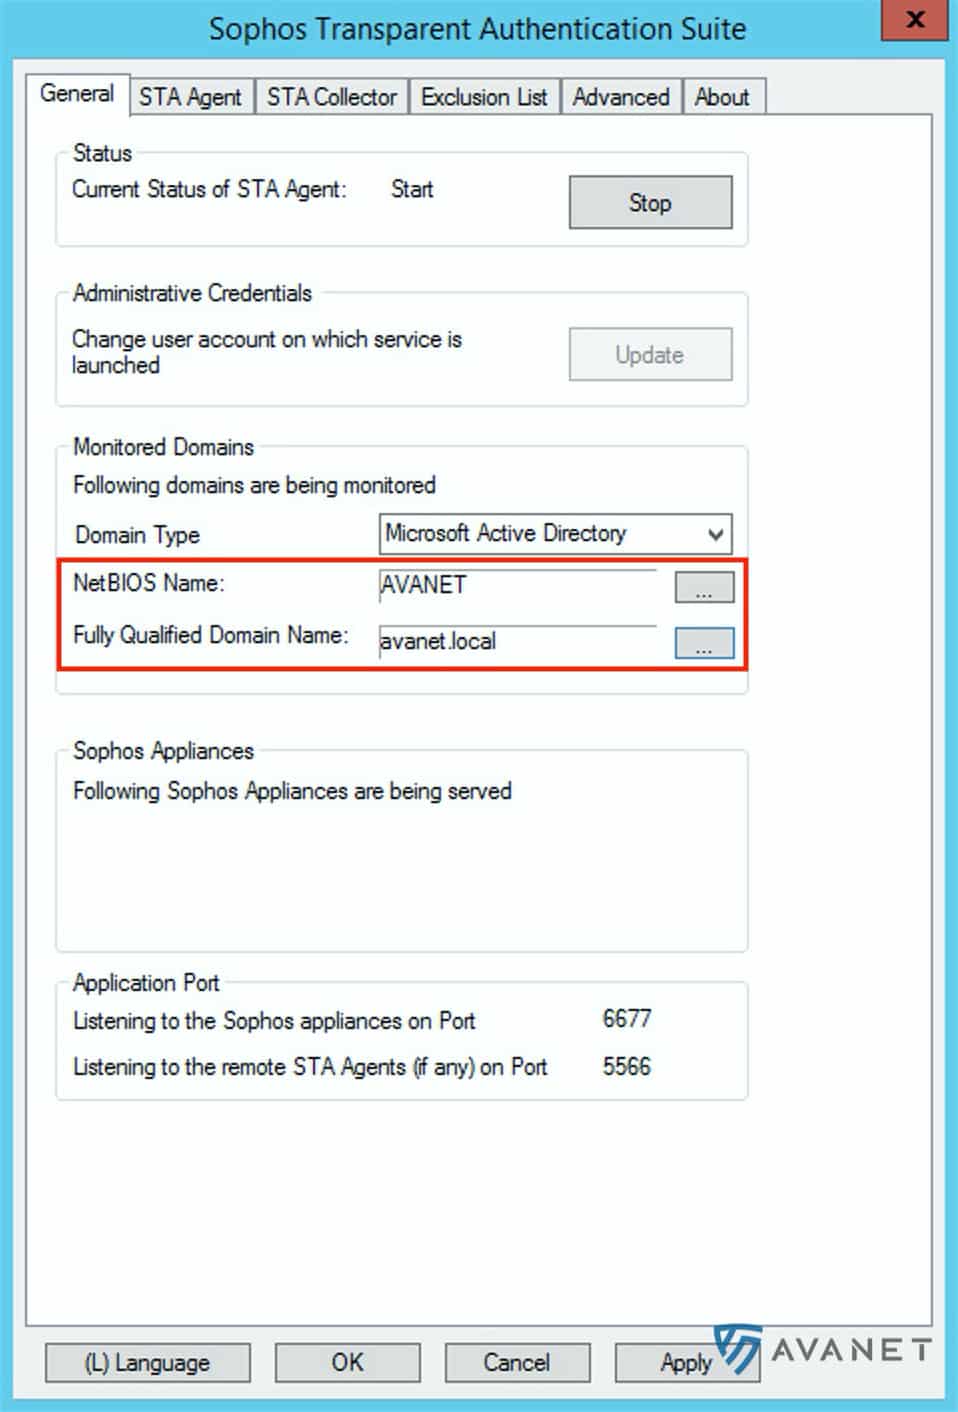
After the installation, the STA Suite still has to be configured. We will go into the relevant settings in the following steps.
In the General tab, you can subsequently change the user with which the service is to be started. But especially check here that the correct NetBIOS name and FQDN are specified.
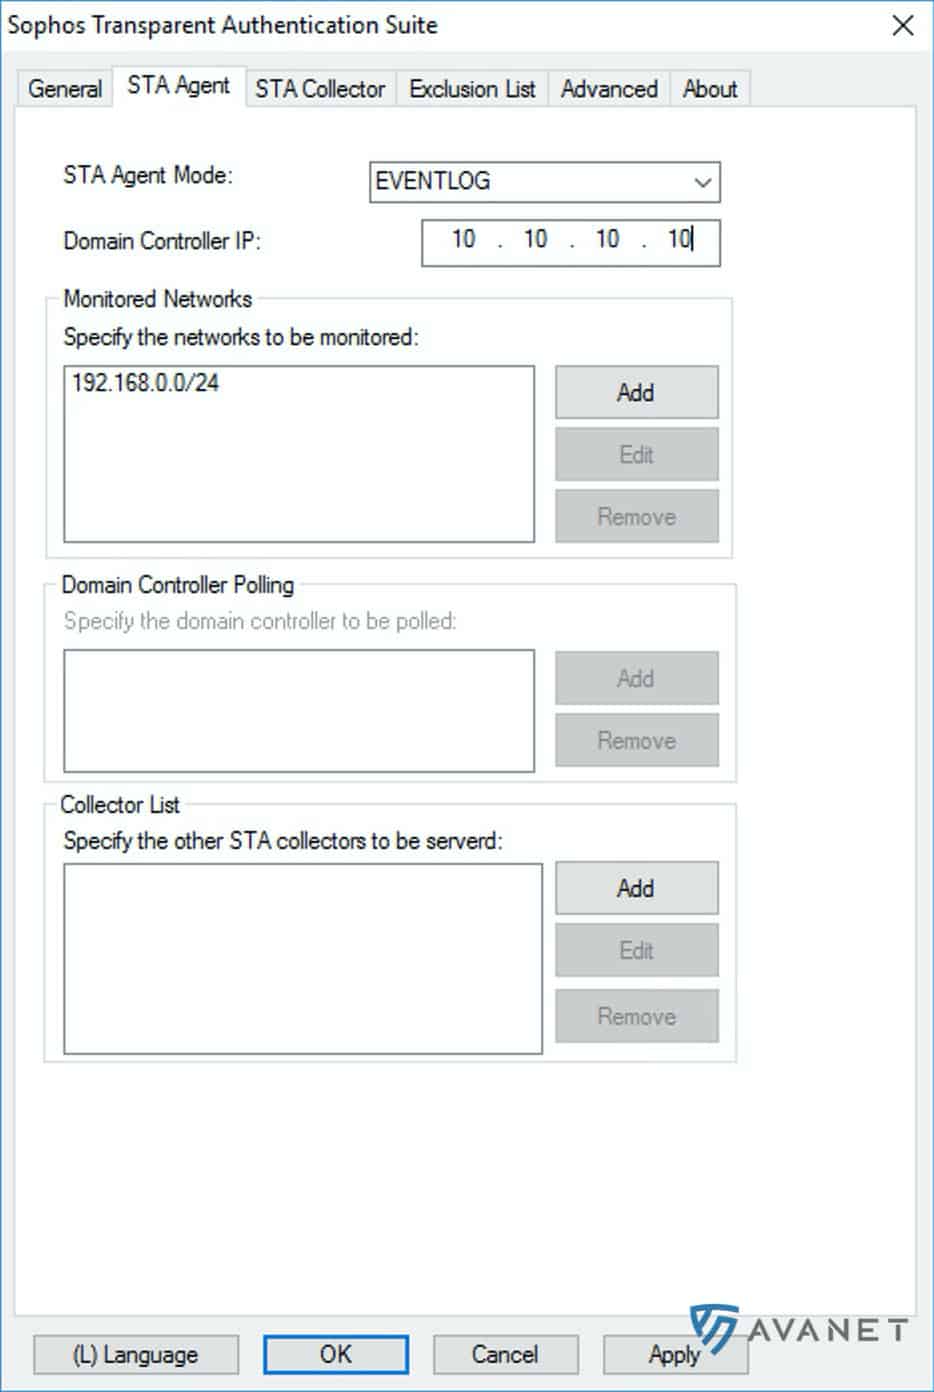
Let’s take a look at what you need to pay attention to under the STA Agent tab:
Let’s take a look at what you need to pay attention to under the STA Collector tab:
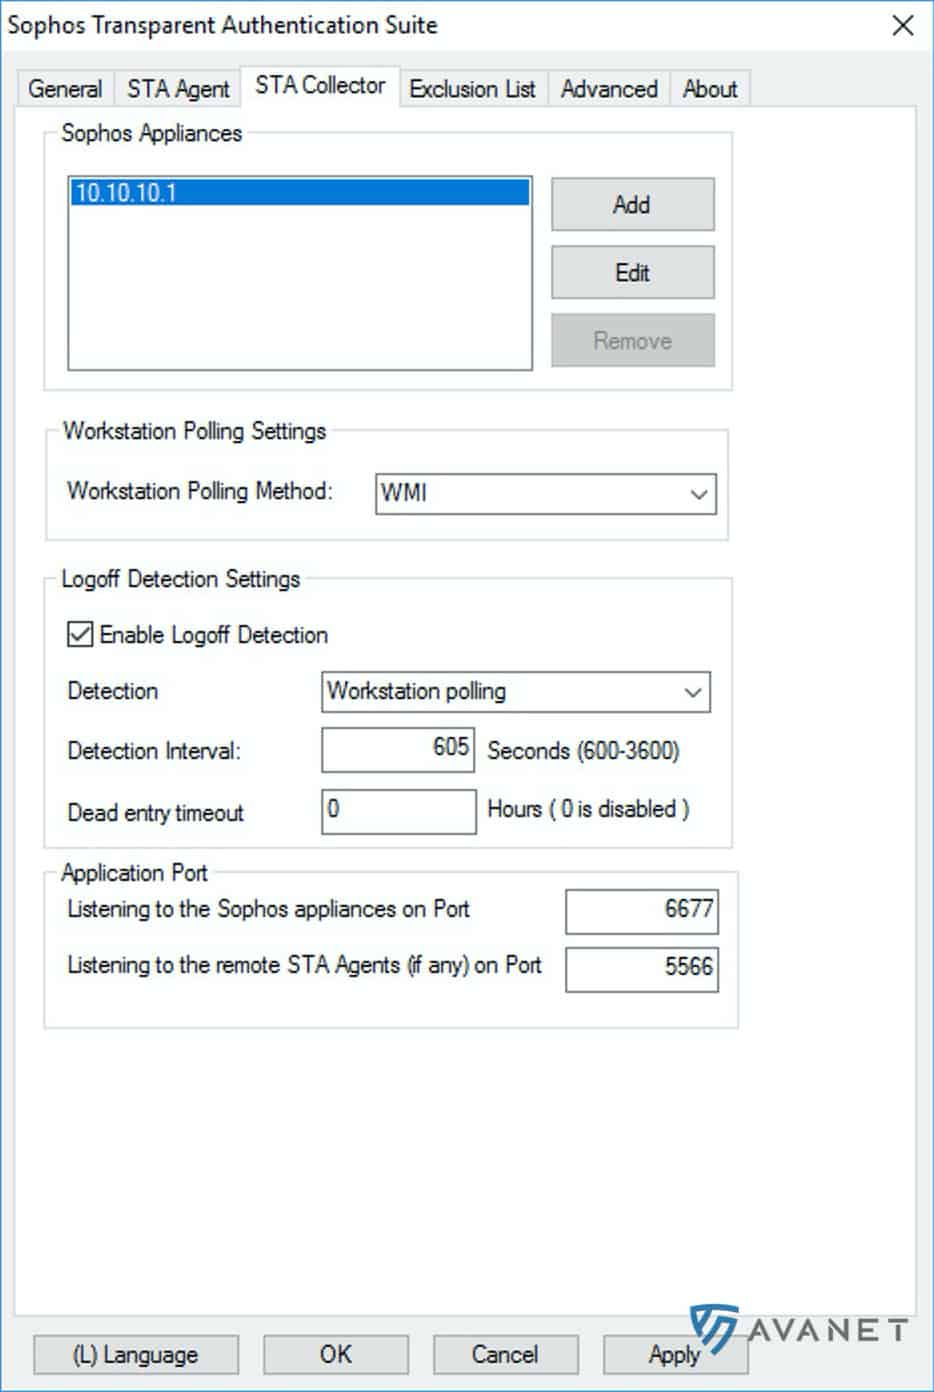
To be able to validate logged in users, there are two options under the Workstation Polling Method section. On the one hand the default selected WMI verification or alternatively Registry Read Access. In both cases, a service must be running on the client.
WMI:
Registry Read Access:
The STA Collector must be able to access the clients. If the Windows Firewall is active on a client, you can create a rule via PowerShell:
New-Netfirewall –DisplayName "Sophos STAS Collector" -Direction inbound –RemoteAddress 10.10.10.10
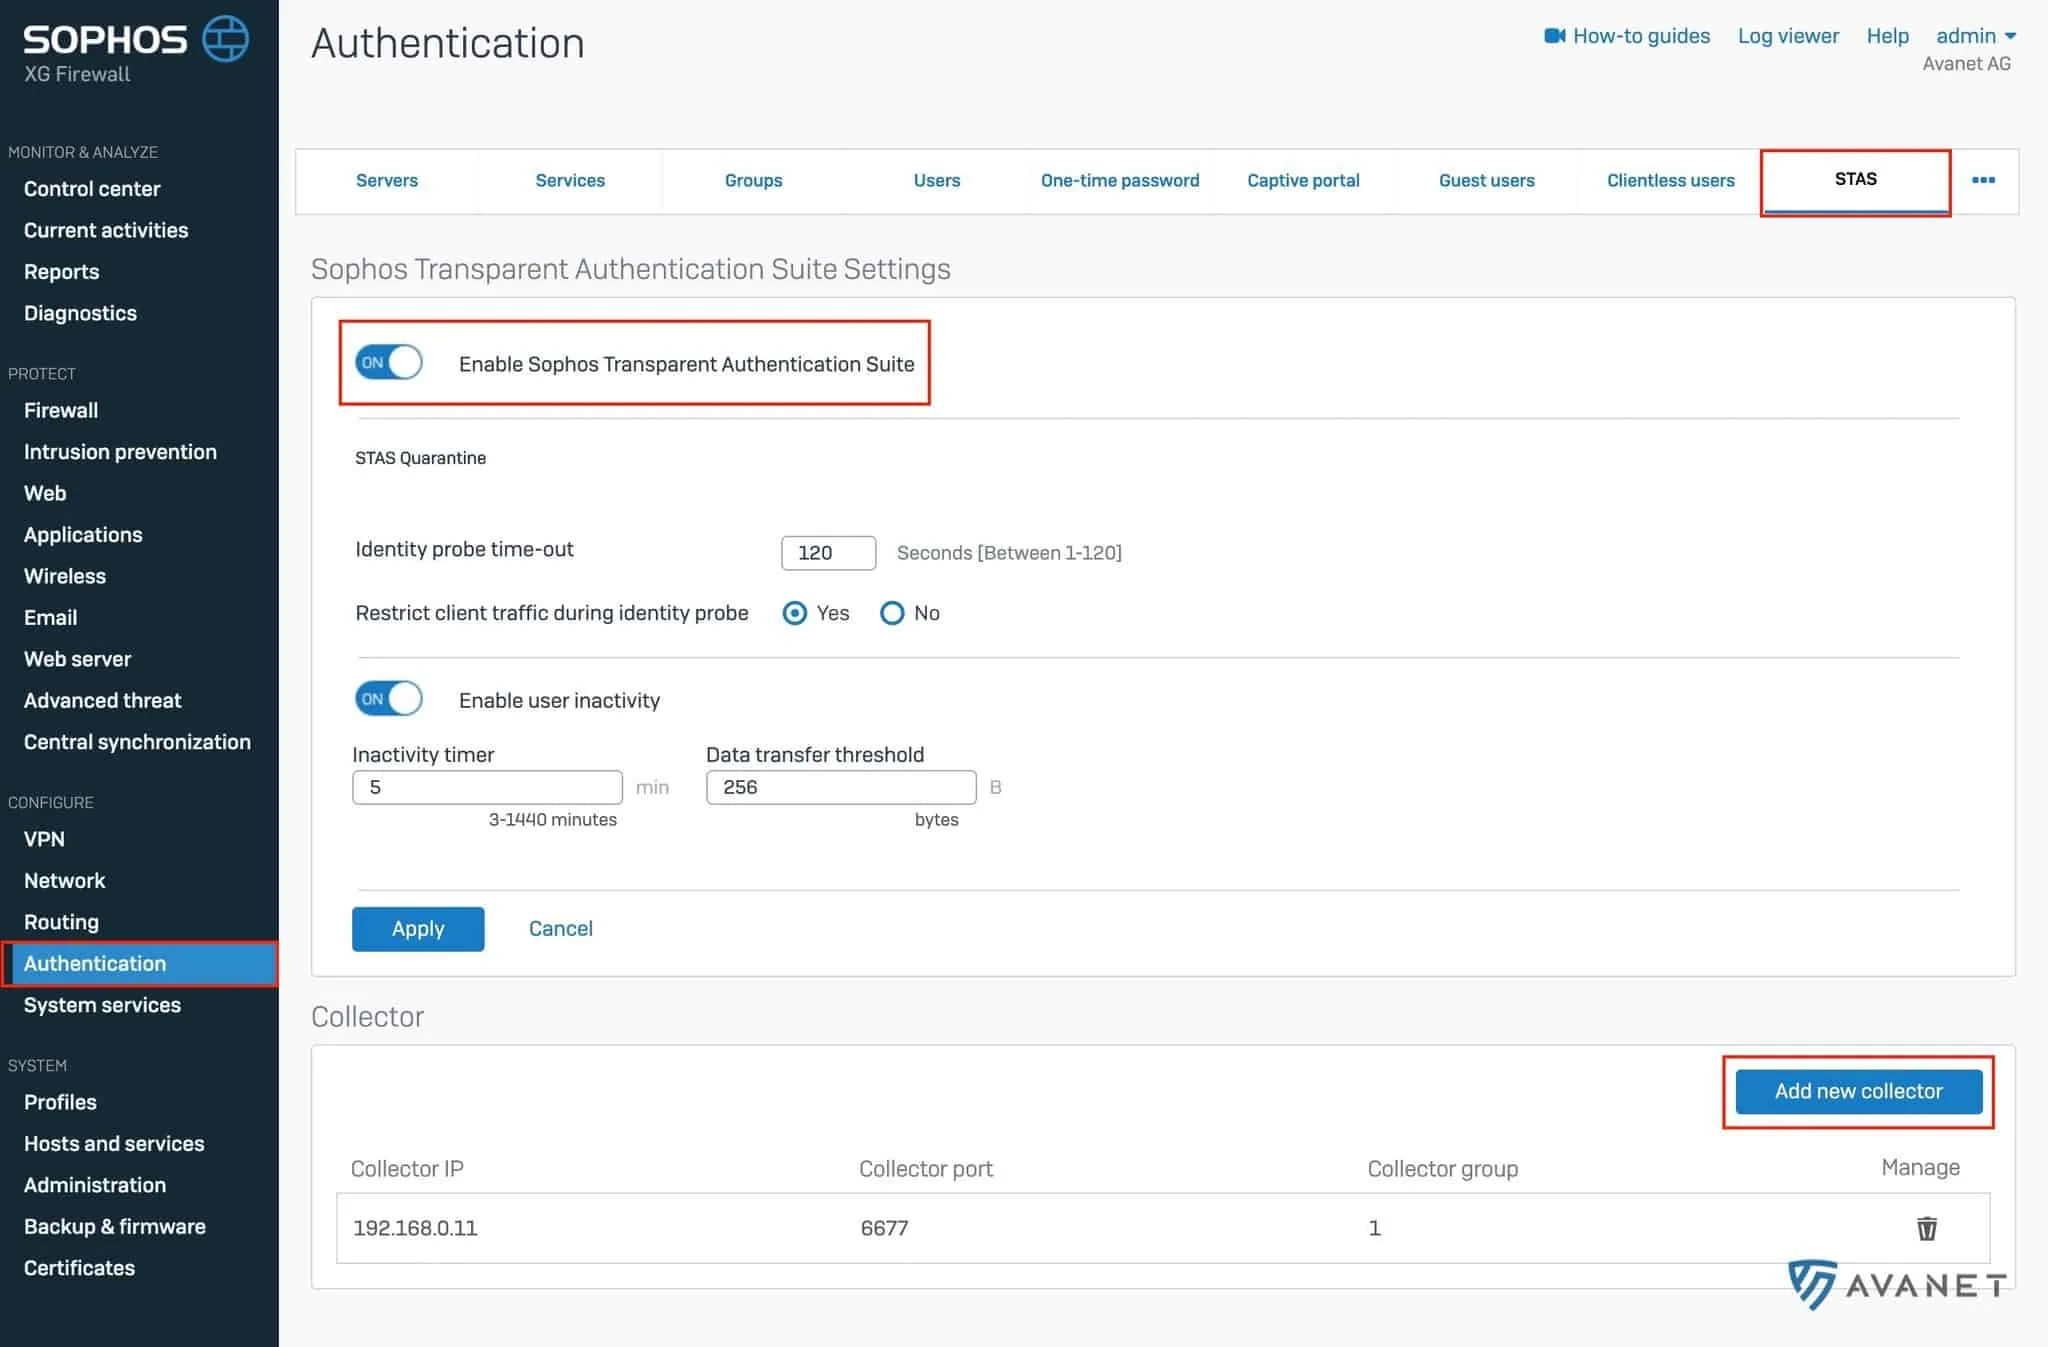
If you have followed these instructions up to this point, data is now already being sent from the STA Collector to the firewall. In order for the firewall to accept this data, STAS must still be enabled on the firewall.
To do this, go to Authentifizierung > STAS on your Sophos Firewall and move the top toggle to ON. So that the firewall knows from which collector it can receive data, you must finally click on the blue button Neuen Kollektor hinzufügen and enter the IP address of the system on which you have installed the collector.
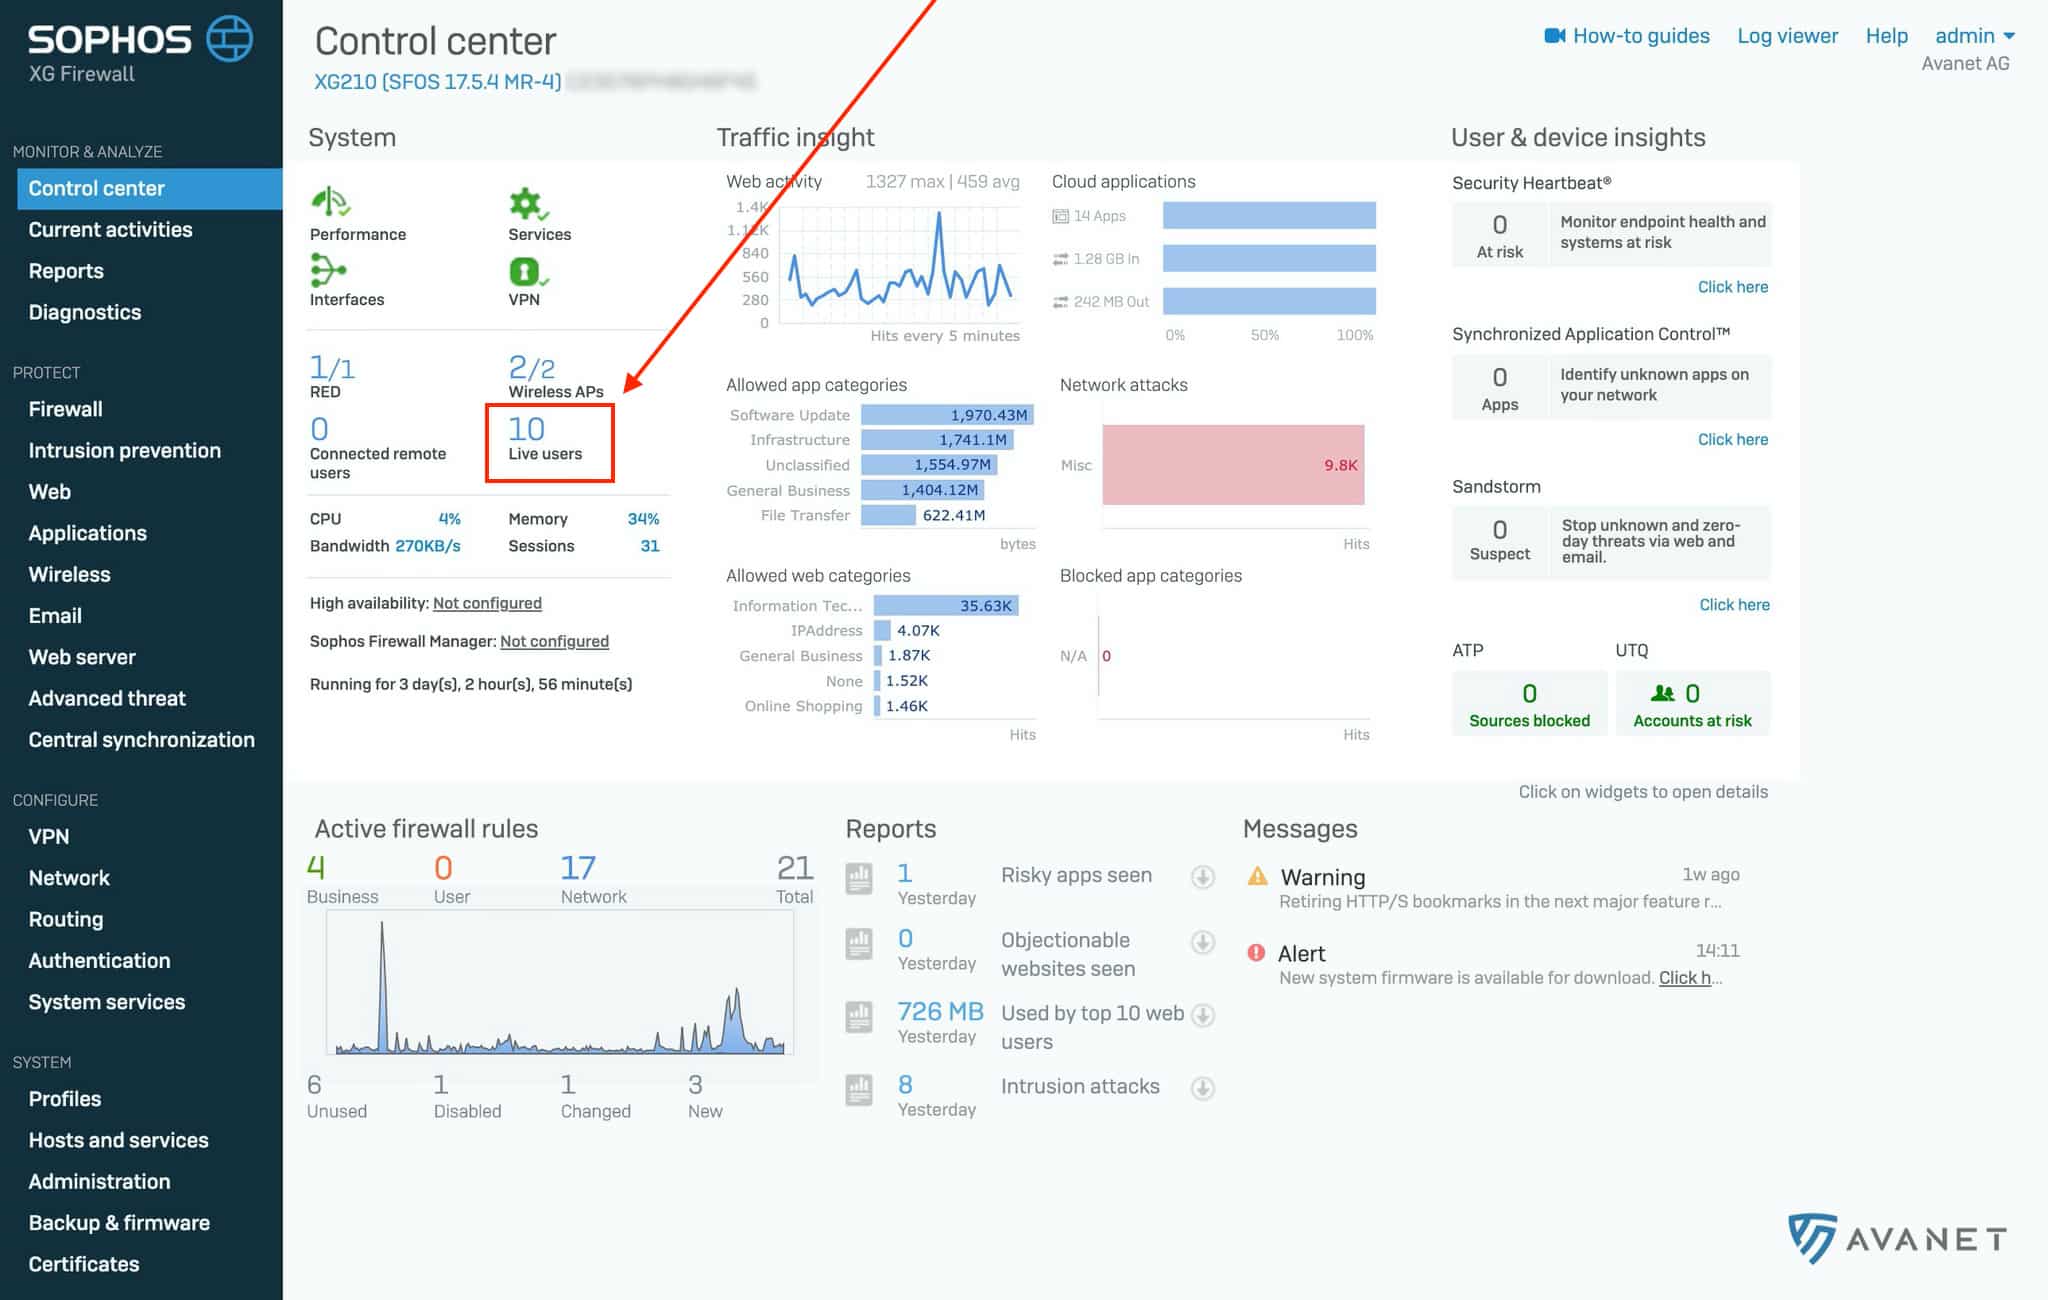
If you have done everything correctly, you will see the logged in users from your Active Directory server in the dashboard of your firewall and in the Live Viewer under Authentication.
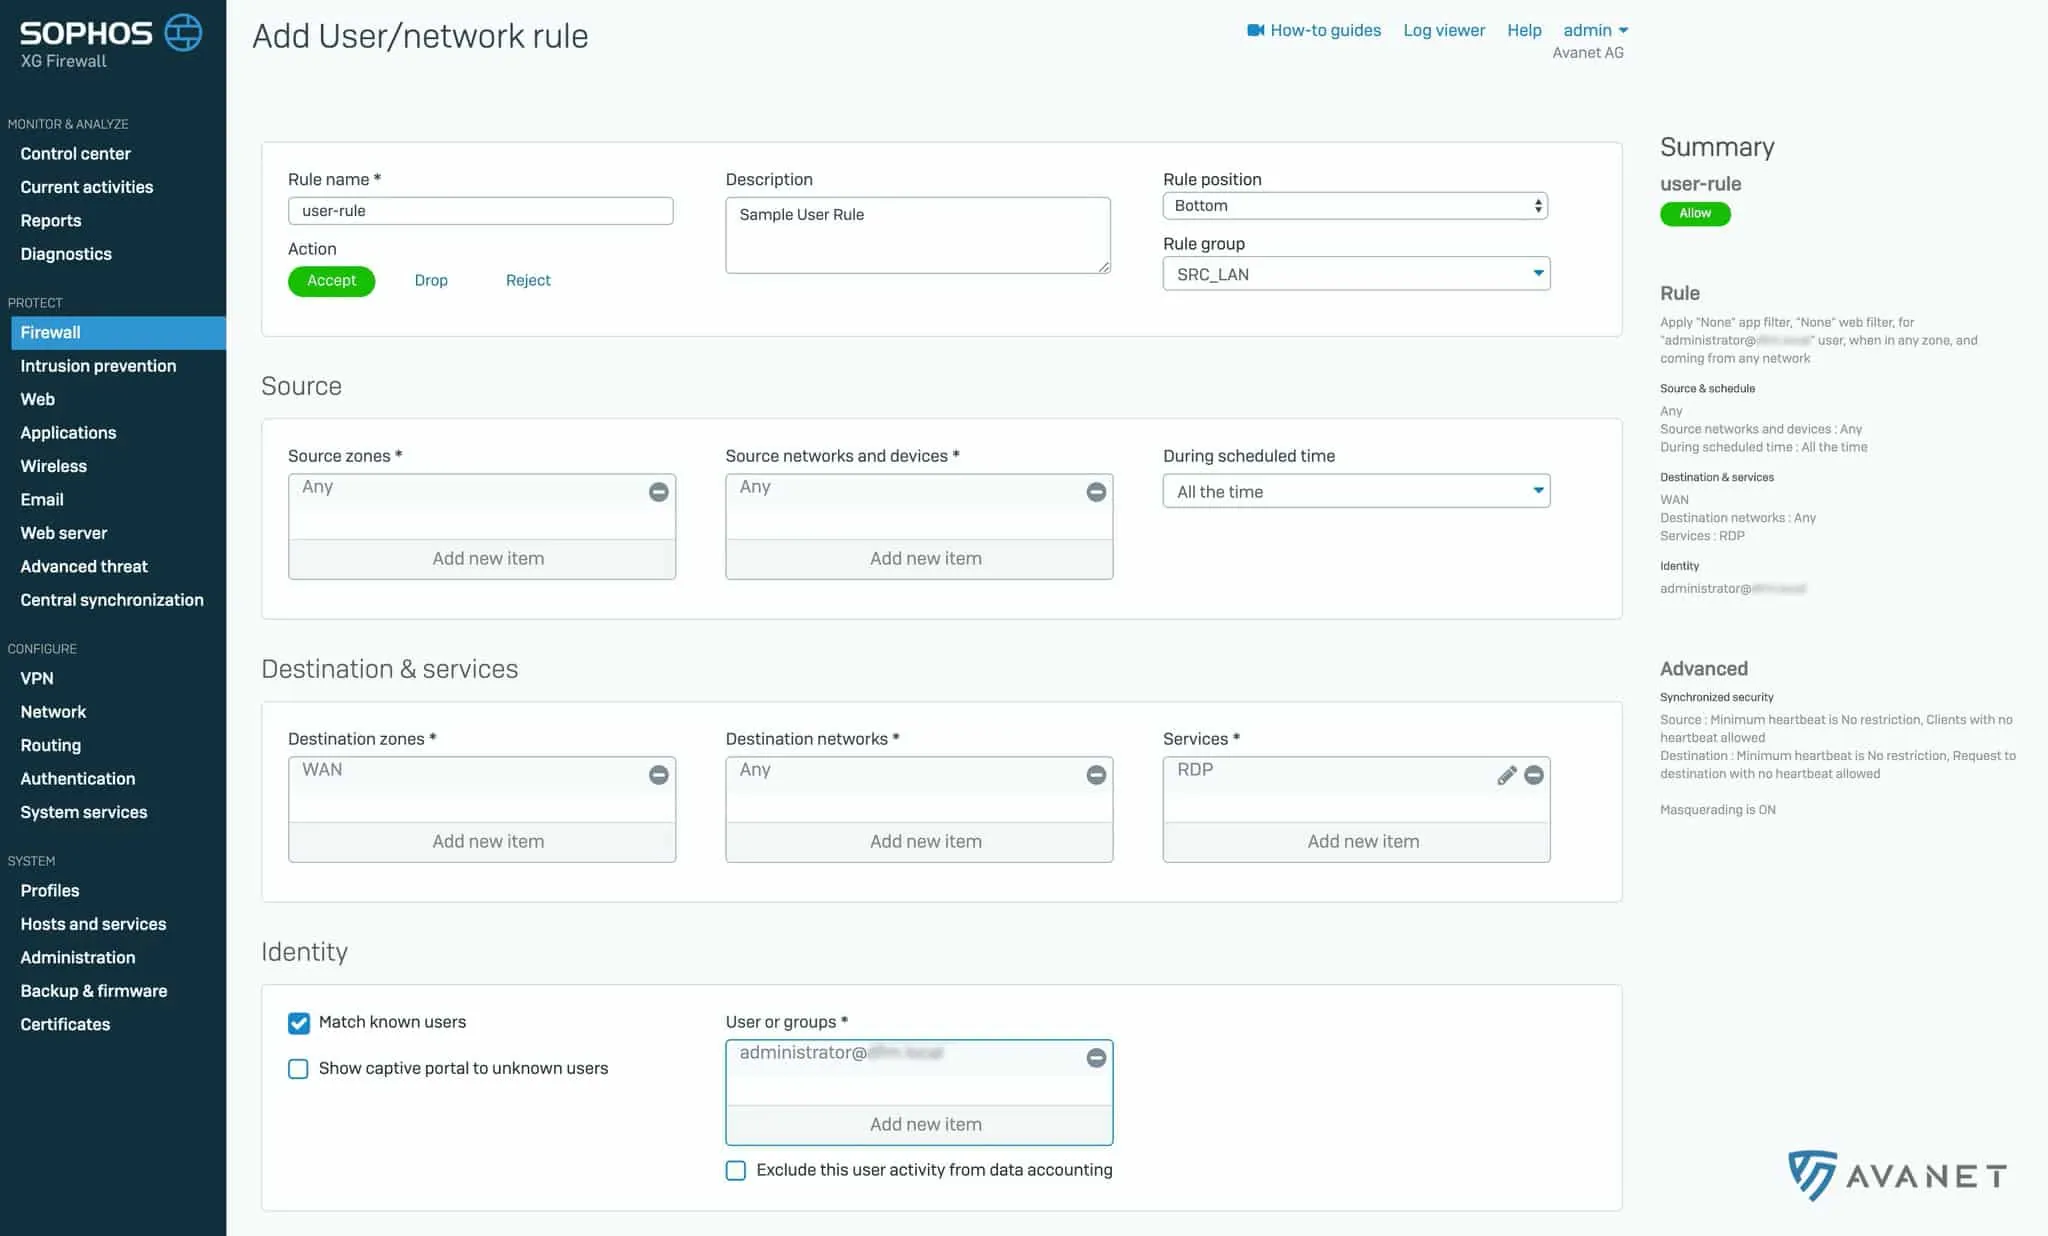
If your tests are all successful, you can now start creating custom firewall rules for specific users or groups that will now be synchronized from your AD to the firewall. For example, in the screenshot below we have created a rule that allows the administrator to access the Internet using RDP (3389).
You have now done it and successfully set up STAS on your Sophos Firewall. You will then find more information that may be of interest to you at this point.
It takes time for the Active Directory server to submit the users to the firewall. To prevent the firewall from simply blocking this traffic in the meantime, unauthenticated traffic is allowed for 120 seconds by default. If you still want to adjust this value manually, you can do this via the CLI:
system auth cta unauth-traffic drop-period <seconds>
STAS is good if you have all single clients in your network. However, as soon as you use a Remote Desktop Server or Citrix, this does not work. Here you need the Server Protection.
In this tutorial we have explained the general standard variant of how STAS can be set up. However, there are of course also special cases, where perhaps several Active Directory servers, subnets and domains are used. In such a case we are of course happy to offer our support. Just contact us with a corresponding request. 👍
Save up to 50%80%70%70%70%70%70%70%70% on a Sophos Firewall of your choice.
XGS 107
30%40%30%30%30%30%30%30%30% OffXGS 116
40%70%40%40%40%40%40%40%40% OffXGS 126
50%70%50%50%50%50%50%50%50% OffXGS 136
50%70%50%50%50%50%50%50%50% OffXGS 2100
50%80%60%60%60%60%60%60%60% OffXGS 2300
50%80%70%70%70%70%70%70%70% OffXGS 3100
50%80%70%70%70%70%70%70%70% OffXGS 3300
20%70%50%50%50%50%50%50%50% OffXGS 4300
50%70%50%50%50%50%50%50%50% OffXGS 4500
50%70%50%50%50%50%50%50%50% OffXGS 5500
50%70%50%50%50%50%50%50%50% OffXGS 6500
50%70%50%50%50%50%50%50%50% Off