Add Sophos Central user
In this article, we will show you how to create users in Sophos Central manually (without Active Directory). Later on, you will be able to assign licenses to these users or assign user policies, for example.
Info: The majority of modules in Sophos Central are licensed per user. So, for example, if you want to roll out Sophos Endpoint Protection to every employee in your organization, you must first create those users in your Sophos Central account. Here we show you how.
Requirements
- Sophos Central Account
- User login with an Admin or Super Admin role
Add user

1. log in to the Sophos Central account
Log in to
https://central.sophos.com
to log in to Sophos Central Admin.
2. manage users
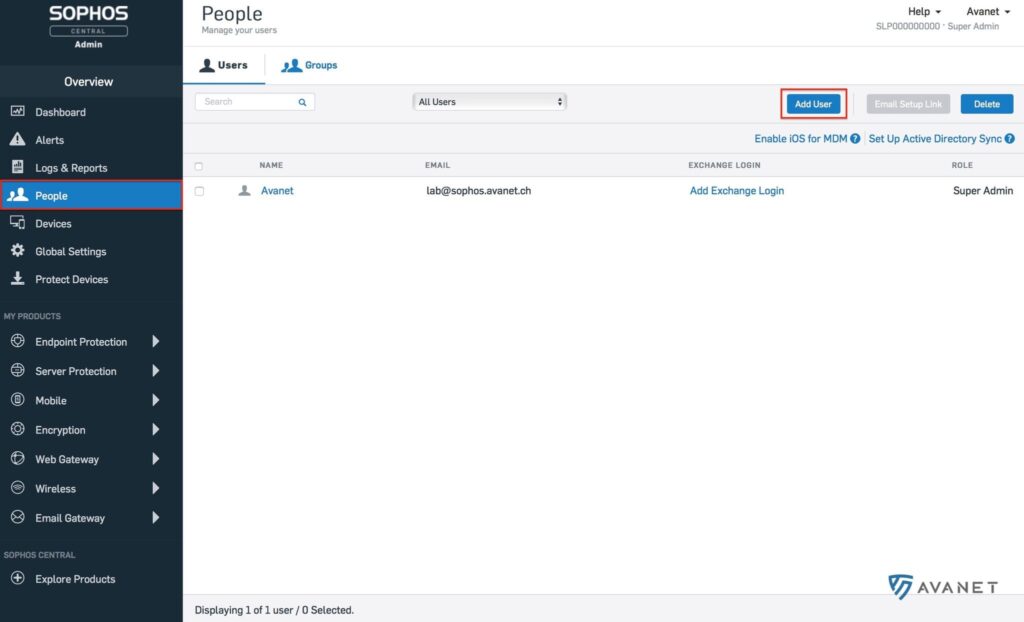
Then click on the menu item People in the sidebar. Now all users are listed, which you have entered so far.
Note: If you haven’t added any users yet, you should see at least one Super Admin.
3. add user
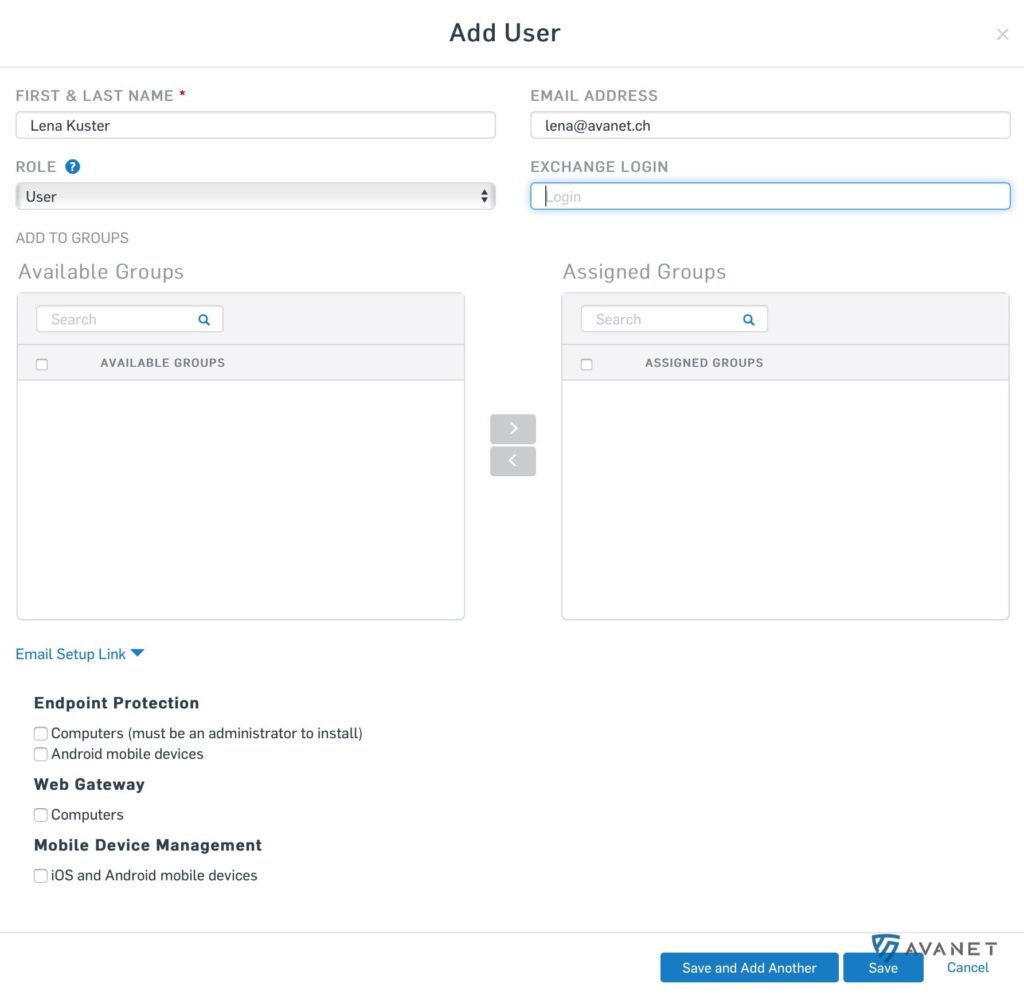
Now click on the blue button Add User in the upper right corner. The following form should then appear:

4. name
In the first field you can specify the name of your user. This can be the first and last name as suggested or you can choose a completely different name such as “CentralAdmin”.
5. email address
It is not mandatory to enter an e-mail address. However, there are functions or services that require an email address.
Important: If you later make settings at Email Setup Link to send the installation links immediately by e-mail, you must also enter an e-mail address when creating the user.
6. define user role
Select a role for the user. The choices are: Super Admin, Admin, Help Desk, Read-only and User.
Note: Only if you are a Super Admin yourself, you can see the “Super Admin” role.
Info: We have explained in more detail what the individual roles do in the article Sophos Central administration roles and their meaning.
7. exchange login
If the user you want to create has an Exchange login, you can specify it here. However, this is not a required field in any case and you can simply leave it blank.
Info: You can specify your user’s Exchange login if you want mobile devices, such as smartphones or tablets, to synchronize with an Exchange server. If you specify the login right here, the user does not have to define these settings on their device themselves.
8. assign to a group
Here you add your user to an existing user group. Just select a group in the left column and click the button with the >.
Note: If you have not yet created a group, of course none will be displayed. You can also assign a user to a group at a later time.
9. email setup link
If you have stored an e-mail address for the user under point 5 of these instructions, you can immediately send the user various download links by e-mail. You can select the following options:
9.1 Endpoint Protection
Under the Endpoint Protection section you can select Computers and Android mobile devices.
- At
Computer, the user gets a link to download Sophos Central Endpoint Protection for Windows and macOS. - At
Android mobile devices, the user receives a link to download the mobile security app for Android and a QR code with which he can verify himself afterwards.
9.2 Web Gateway
If you select this option, the user will get a link to download the Sophos Central Web Gateway.
9.3 Mobile device management
With this option, the user gets a link to download Sophos Central Mobile for iOS and Android with a QR code, which they can use to verify themselves afterwards.
10. save and continue
And that was it! To create the user now, just click on Save or Save and Add Another to create another user right away.